Git Undo
Goals
- Be able to identify commits in Git relative to HEAD, by checksum, and by tag.
- Learn how to revert commits.
- Practice backtracking to a previous commit and creating a new branch.
- Know how to unstage single files or all staged files.
- Learn how to discard commits.
- Understand the difference between soft, mixed, and hard resets.
- Know how to discard all changes in the working directory.
- Learn about tags and how to use them.
Concepts
- annotated tag
- detached
HEAD - hard reset
- lightweight tag
- mixed reset
- revert
- soft reset
- tag
- undo
- unstage
Lesson
One of the most common things you might want to do with Git is undo the effects of some action you performed using Git. This is one of the things you would expect Git to excel at, because it keeps a history of everything you've ever committed in a project. With Git however there is a seemingly endless way of “undoing” things you've done: “reverting”, “backtracking”, “resetting”, “unstaging”, “discarding”, and “amending”, just to name a few. Git makes things more difficult by many times failing to provide a single, semantic command for simple operations, instead requiring you to figure out the specific combination of commands that will effect the result you're looking for.
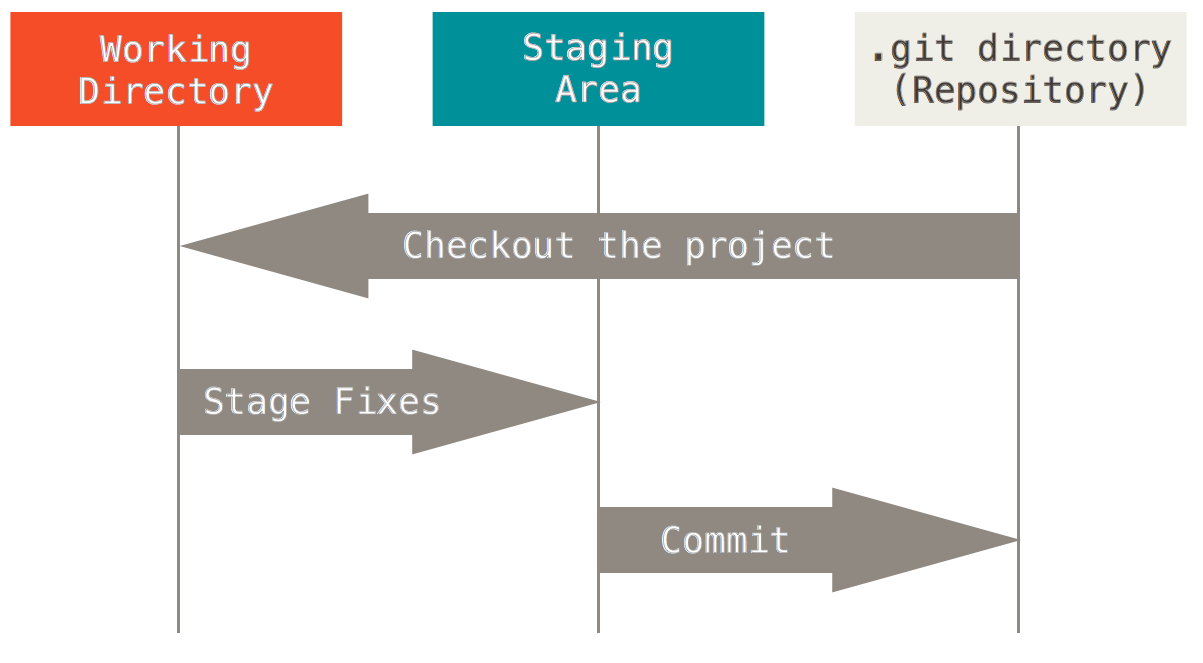
Complicating things is the fact that Git maintains three separate working areas, which multiplies the options available for the relevant commands. The following discussion attempts to tease apart the various ways you can get back to where you were in Git and do things differently. It will greatly help your understanding if you can stay with an image of the three Git working areas fixed in your mind, and relate the following commands to these working areas as you learn about them.
Commit Identification
Often the operations you want to “undo” relate to past commits, so you'll need to know how to identify them. You can refer to a commit's parent using the caret ^ character. Thus HEAD^ refers to the first immediate parent commit of HEAD. You can append multiple carets to go up various levels, for example HEAD^^ to identify the “grandparent” commit. A shorthand for traversing multiple levels is to use the tilde ~ character with a number; HEAD~2 is the equivalent of HEAD^^, for example.
Undo
Reverse a Commit: git revert <commit> --no-edit
When Git reverts a commit, it reverses the changes in a past commit—any commit—and creates a new commit with the reverted files. This means that git revert will never remove history; it will actually add to the history!
The simplest use case for using revert is when you have just made a commit that you wish you had not made. You can tell Git to revert the last commit by finding the identifier for that commit, but an easier approach would be to indicate HEAD, as HEAD is pointing at the last commit you made.
git revert HEAD --no-editThis will reverse the changes in the last commit and create a new commit with the results.
Backtrack with a New Branch
Another way to get earlier changes back is to “backtrack” to a previous commit and start a new branch there. This doesn't actually get your previous version back into the master branch (or whatever branch you were working on), but instead creates a new branch on which you can work with your old code—and even merge it back into the master branch if you want to. This approach requires you do do two steps:
- Check out the commit in history using
git checkout <old-commit>. This puts your repository in detachedHEADstate, becauseHEADis no longer paired with any branch pointer. - Create a new branch and check it out using
git check -b <new-branch>.
Thus if you wanted to go back to the previous commit, you could use git checkout HEAD~. Then you could create a new branch named another-way, starting work on this new branch in your previous state.
git checkout HEAD~
git checkout -b new-approach
Don't forget that eventually you would probably want to merge the new-approach branch back into master.
Unstage Individual Files: git reset <file>...
When learning how to stage files, it was briefly mentioned that you can unstage a file using a form of git reset and indicating the filename.
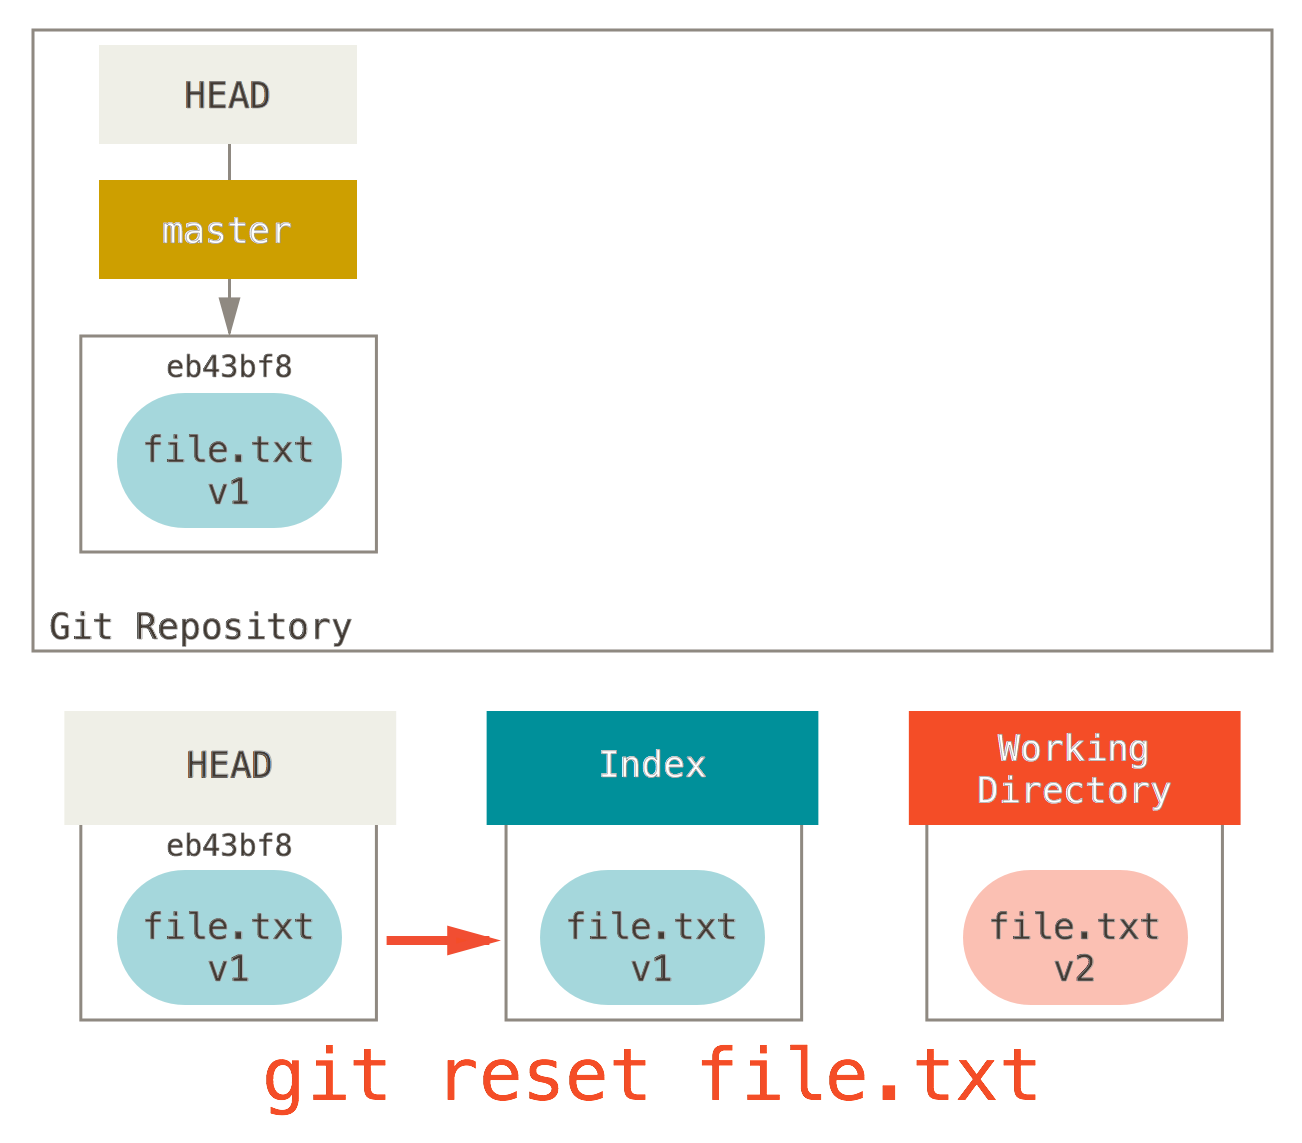
git reset file.txt. (Pro Git, Second Edition)git reset file.txtThis tells Git, “Reset the file in the Staging Area to the whatever is stored in the history at HEAD.” The files in the Staging Area (also referred to in the Git documentation as the “Index”) will be put back to what they were before, effectively undoing the git add <file> command.
Unstage All Files: git reset
If you issue the git reset command without specifying any files, Git will unstage all files. Git does this by copying the entire contents of HEAD to the staging area, replacing any files that were currently staged.
git resetDiscard Commits After a Certain Commit: git reset <commit>
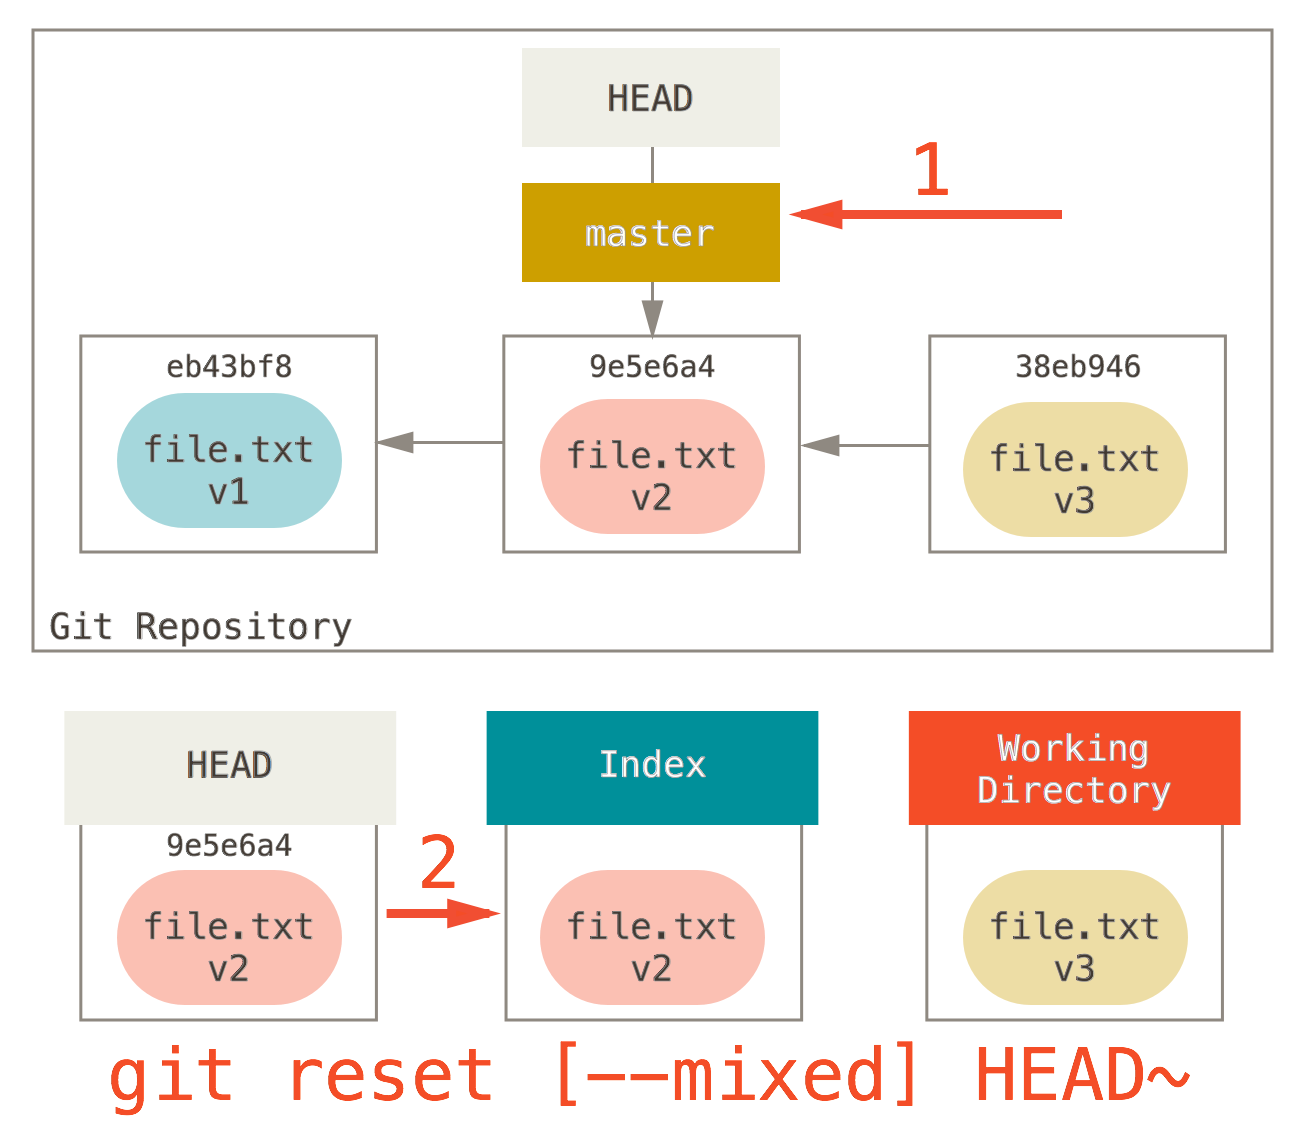
git reset --mixed HEAD~. (Pro Git, Second Edition)Specifying a commit with the reset command will move the branch pointer specified by HEAD to the commit specified—effectively discarding all subsequent commits. Then Git will copy the contents of the indicated commit to the Staging Area, just as it does if you don't indicate a commit (explained above under Unstage All Files). For example rather then reverting the last commit (which would add a new commit), with reset you could actually discard the last commit by moving the branch pointer to the previous commit.
git reset HEAD~In the figure on the right, the last commit (HEAD) on the master branch was originally 38eb946, which contained version 3 of file.txt. Calling git reset HEAD~ (which uses --mixed mode by default) performs two steps:
- Git moves the
HEADbranch (master) pointer to the previous commit9e5e6a4, containingversion 2offile.txt. - Git copies the contents of the
9e5e6a4commit to the Staging Area (Index).
In other words, git reset <commit> has the effect of modifying the history of your local repository! Any work you have committed after the indicated commit will be lost. You could also for example discard both versions 2 and versions 3 of file.txt by indicating eb43bf8, the commit containing version 1 of file.txt.
eb43bf8.git reset eb43bf8If you specify --soft instead of --mixed, a Git reset will only perform the first step above—moving the branch pointer—but will not modify the contents of the Staging Area. In other words, the presence of --soft will leave any previously committed files in Staging Area, ready for committing. When used to discard the last commit, this option effectively puts Git in the state immediately before the last commit, with your files still staged for committing:
git reset --soft HEAD~Discard All Local File Modifications
If you've made changes in your Working Directory, but give up and decide you want to start over, the --hard option for the Git reset command will reset your Working Directory files to match the files committed in the branch. The --soft option, as explained above will not copy any files, while the (default) --mixed option will copy files from a commit to the Staging Area. Using the --hard option will go one step further and copy the files to your Working Directory, overriding any changes you've made there.
git reset --hard
git reset --hard HEAD~. (Pro Git, Second Edition)As with --soft and --mixed, the --hard option allows you indicate a specific commit to reset the branch to.
git reset --hard HEAD~This command results in three steps—the same two as above with --mixed, but with the additional step of copying the commit to the Working Directory.
- Git moves the
HEADbranch (master) pointer to the previous commit9e5e6a4, containingversion 2offile.txt. - Git copies the contents of the
9e5e6a4commit to the Staging Area (Index). - Git copies the contents of the Staging Area (Index) to the Working Directory so that now it too contains the contents of commit
9e5e6a4.
Discard Individual Local File Modifications: git checkout <file>...
You are already accustomed to using git checkout <branch> to switch branches. You learned that this command will do two things:
- Git will move
HEADto the indicated branch, and - Git will update the files in your working copy to match the contents of the new
HEAD.
But if you indicate a specific file using this command, Git will only perform the second part of this sequence: update the files in your working copy to match the contents of the indicated branch.
Therefore if you have modified the contents of a file in your Working Directory but haven't yet committed the file, you can undo the changes you have made by entering git checkout HEAD filename.ext. Almost always you will be wanting to undo the modifications based upon what is in HEAD, so you can just leave off the branch identifier, as recommended by Git:
git checkout filename.extTags
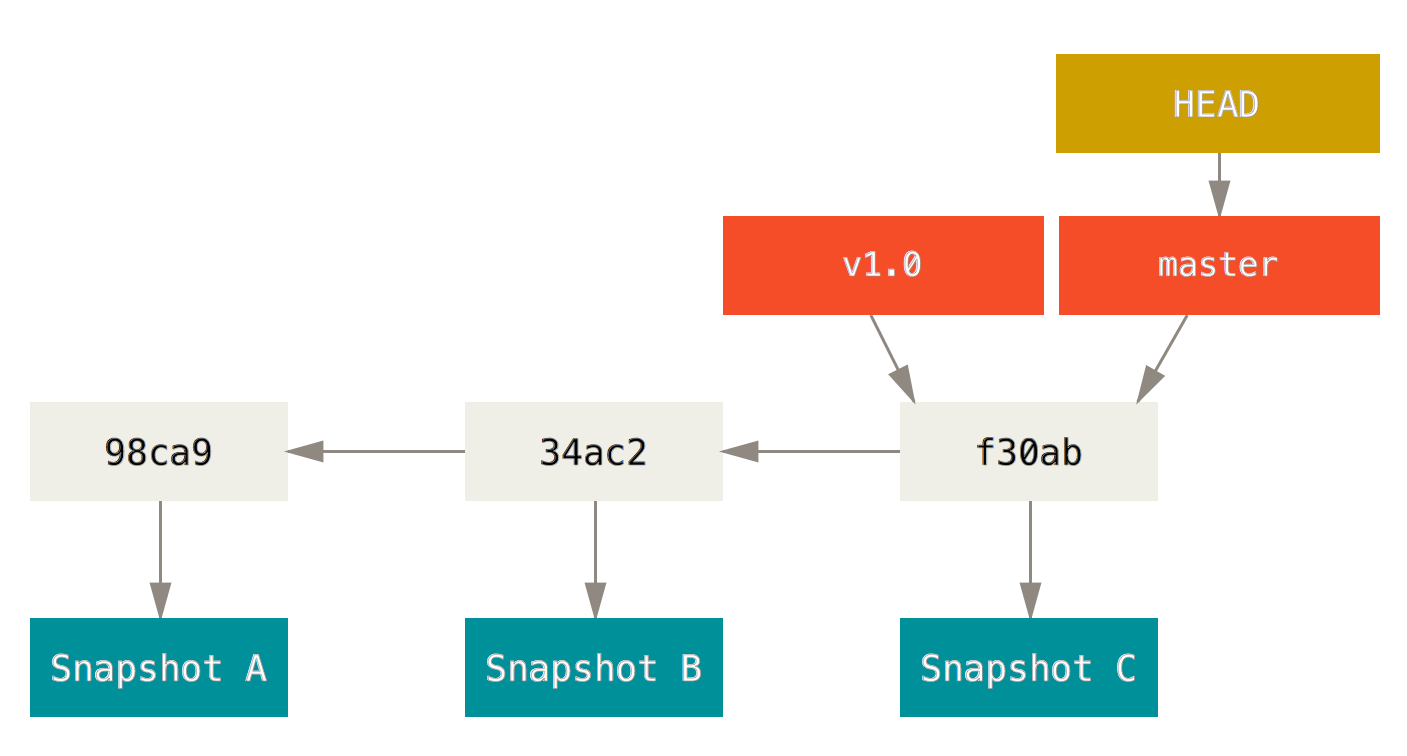
Now that you have the power to go back to certain commits, you may want to label certain commits as being especially important or memorial in case you want to refer to them later. A tag is a pointer to a commit, similar to a branch pointer except that a tag does not move when you make commits. Referring to a tag name is usually easier than referring to a commit using its 40-character checksum. One of the most common uses of a tag is to mark a commit as that used for an official release build.
List Tags: git tag --list
To see all the tags in your repository, git tag command with the --list flag, or with the abbreviated -l form.
git tag --listCreate Tag: git tag <tag-name> -m "<message>"
An annotated tag will keep track of who created the tag, the creation time, as well as an annotation message specified by the --message or -m option.
git tag v1.0 -m "Released version 1.0."Assuming you were at commit f30ab on the master branch when you created the tag, a tag will be added as shown in the figure on the right. The tag pointer is independent of the branch pointer; when you make additional commits, the master branch and HEAD pointers will move forward but the v1.0 tag will stay at commit f30ab.
If you've already made additional commits before remembering to create a tag, you can still add a tag to a previous commit simply by identifying the commit in the command. In the figure above you could add a tag “v0.9” to the first commit in the sequence by indicating commit 98ca9.
git tag v0.9 -m "Released beta version." 98ca9Show Tag: git show <tag-name>
Find out more information about a tag by using the git show command. For annotated tags this provides the identity of the person adding the tag, the date, any other information stored with the tag, and the associated commit.
git show v1.0Send to Remote: git push <remote-name> <tag-name>
Git doesn't send your tags to the remote repository by default when pushing. You'll remember that git push is short for a push to origin for the current branch, such as git push origin master. Pushing a branch takes exactly the same form, substituting the tag name for the branch name.
git push origin v1.0Using Tags
You can refer to tags almost anywhere where you would refer to a commit in the discussion throughout this lesson. For example you could backtrack to the v0.9 beta release tag and start another branch there:
git checkout v0.9
git checkout -b 0.9/bugsDelete a Tag: git tag --delete <tag-name>
Deleting a local tag works similarly to deleting a local branch, using the --delete or -d flag with the git tag command.
v0.9 tag.git tag --delete v0.9Review
Summary
| Command | Description | Example |
|---|---|---|
| Local Repositories | ||
git init | Initializes the current directory as a Git project with a Working Area, Staging Area, and Local Repository. | git init |
git add <file> | Adds a file to the Staging Area but does not commit it to the Local Repository. The added file must be committed before the Repository is changed. | git add readme.txt |
git reset <file> | Removes a file from the Staging Area that has not yet been committed. | git reset readme.txt |
git status | Shows the status of the files in the Working Directory. | git status |
git diff [--staged] | Shows differences between the Working Directory and the Staging Area; or if --staged is included, between files in the Staging Area and the Repository. | git diff |
git commit [--all|-a] --message|-m <"log-msg"> | Commits all files in the Staging Area to the Repository, optionally first adding modified files if --all (-a) is included | git commit -m "log message goes here" |
git log [<file>] | Shows history of commit log messages for the Repository, or for a single file. | git log |
git rm <file> | Removes a file from the Working Directory and from the Staging Area. Equivalent to manually removing a file from the Working Directory and then using git add for the removed file. The removal must be committed before the Repository is changed. | git rm readme.txt |
git bundle create <file> --all | Creates an archive file of the entire history of Local Repository. | git bundle create repo.bundle --all |
| Remote Repositories | ||
git clone <remote-url> [<directory>] | Downloads a copy of an entire remote repository and installs it in a local repository. | git clone https://username@gitlab.com/username/project.git |
git remote [--verbose|-v] | Lists remote repositories | git remote |
git remote add <remote-name> <url> | Adds a remote repository and gives it a name. | git remote add origin https://username@gitlab.com/username/project.git |
git fetch [<remote-name>] | Retrieves latest changes from the remote repository, but does not merge it into current version. | git fetch origin |
git pull [<remote-name>] | Performs a combination of fetching from the remote repository and merging the retrieved commits into the current local branch. | git pull origin |
git push [--set-upstream|u] [<remote-name>] [<branch-name>|--all|--tags] | Pushes the latest commits on the named branch to the indicated remote repository, optionally setting up the branch to track the remote branch. You can also specify that all branches or tags should be pushed. | git push origin master |
| Branches | ||
git branch [--list] [--remotes|-r] | Lists all local or remote branches. | git branch --remotes |
git branch <branch-name> | Creates a new branch. | git branch testing |
git branch --delete|-d <branch-name> | Deletes a branch. | git branch -d testing |
git checkout [-b] <branch-name> | Switches to a branch; optionally creates the branch as well if -b is given. If -b is not given, if the branch doesn't exist locally but there is a remote branch with a matching name, this becomes the equivalent of git checkout -b <branch> --track <remote>/<branch>. | git checkout testing |
git checkout --track <remote-name>/<branch-name> | Checks out and tracks a remote branch | git checkout --track origin/testing |
git merge [<branch-name>] | Merges changes from another branch into the current local branch. | git merge origin/master |
git push [--set-upstream|u] [<remote-name>] [<branch-name>|--all|--tags] | Pushes the latest commits on the named branch to the indicated remote repository, optionally setting up the branch to track the remote branch. You can also specify that all branches or tags should be pushed. | git push origin master |
git push origin --delete|-d <branch-name> | Deletes a remote branch. | git push origin -d testing |
git remote prune <remote-name> | Removes all local references to remotes branches that no longer exist. | git remote prune origin |
| Undo | ||
git revert <commit> --no-edit | Adds a new commit that reverses the changes of the identified commit. | git revert HEAD --no-edit |
git reset <file>... | Unstages indicated file(s). | git reset readme.txt |
git reset | Unstages all files. Same as git reset --mixed. | git reset |
git reset <commit> | Discards all commits after the given commit. The Working Directory is not modified. Same as git reset --mixed <commit>. | git reset HEAD~ |
git reset --soft <commit> | Discards all commits after the given commit. Leaves modifications staged in Staging Area. | git reset --soft HEAD~ |
git reset --hard <commit> | Discards all commits after the given commit. Discards all changes to the Working Directory. | git reset --hard HEAD~ |
git reset --hard | Discards all changes to the Working Directory. | git reset --hard |
git checkout <file>... | Discards modifications to the indicated file(s). | git checkout readme.txt |
| Tags | ||
git tag [--list|-l] | Lists all tags. | git tag |
git tag <tag-name> -m "<message>" [<commit>] | Creates an annotated tag, optionally specifying a commit to tag. | git tag v1.0 -m "Released version 1.0." |
git push [<remote-name>] <tag-name>|--tags | Pushes the named tag to the indicated remote repository. You can also specify that all tags should be pushed. | git push origin v1.0 |
git tag --delete|-d <tag-name> | Deletes a tag. | git tag --delete v0.9 |
git push origin --delete|-d <tag-name> | Deletes a remote tag. | git push origin --delete v1.0 |
Revert
The Git revert command adds a new commit reversing the changes of another commit.
Reset
The Git reset command performs the following actions, based upon the form used:
- Move the
HEADbranch (e.g.master) to the indicated commit only if a commit was indicated. If--softwas indicated, no further action takes place. - Copy the contents of the now-current commit to the Staging Area (Index) only if
--mixedor--hardwas indicated. - Copy the contents of the Staging Area (Index) to the Working Directory only if
--hardwas indicated.
Gotchas
- Don't use the caret
^character on the Windows command line, because it will be considered an escape character. - Reverting a merge will cause Git to prevent merging the reverted information in the future on the merging branch.
- If you accidentally discard commits you've already pushed, you will have a hard time fixing the situation. If you do manage to push your changes, your teammates will not be happy that you discarded commits that they had pulled into their own repositories.
- Using
git reset --hardhaphazardly is a sure way to lose some of your hard work from your Working Directory. - Forgetting to add a message or to use the
--annotate(-a) flag when creating a tag will create a lightweight tag; your team probably prefers annotated tags instead.
In the Real World
- Don't discard commits that you've already pushed to a remote branch.
- Don't amend commits that you've already pushed to a remote branch.
- You can discard and amend commits if you are sure no one else has pulled changes from your remote branch, but it is still not good to get into a habit of this behavior, or you will inadvertently lose important changes of your own. If you absolutely must discard a pushed commit, play it safe and notify your team members first.
Recovering a Deleted Directory: git checkout <commit> -- <directory>
At some point you will likely need to recover an entire directory you're removed at some point in the past. First find the commit at which the directory was deleted. Then check out one commit before that, specifying the deleted path you want to restore.
For example if you deleted the directory misc/stuff in commit abcde, you can restore it with the following command. Note the presence of ~ to indicate that you are restoring from one commit earlier than the one indicated. The -- is added as a precaution to prevent the directory path from being confused with a branch name or some other identifier.
git checkout abcde~ -- misc/stuffSee an example at restoring a directory from history.
Think About It
When determining which variation of git reset to use, think about the three areas of the Git repository that could be affected.
- Do you simply want to discard one or more commits in the Local Repository, without affecting the Staging Area or the Working Directory?
git reset --soft <commit>- Do you want to discard commits in the Local Repository, but leave your changes staged in the Staging Area?
git reset [--mixed] <commit>- Do you want to discard all your changes in the Working Directory, without affecting the Staging Area or Local Repository?
git reset --hard- Do you want to discard commits in the Local Repository, unstaging all files, and losing all your Working Directory?
git reset --hard<commit>
Self Evaluation
- What is the purpose of the
--option in Git commands? - Which commit does
HEAD^point to? Which commit doesHEAD~point to? - What are the differences among the commit identifiers
HEAD^^,HEAD^2, andHEAD~2? - What is the danger of using the caret
^relative branch indicator on the Windows operating system command line? - Why is the Git
revertcommand considered “safe”? - What would happen if you were to issue the command
git revert HEADtwice in a row after a non-merge commit? - If you revert a merge commit, what is the behavior of future merges between the two branches?
- What two steps would you use to go back and create a new branch at a previous commit? What single command could you use to perform both steps at one time?
- How is the behavior of
git resetdifferent if you provide a commit identifier and if you do not? - Which is the default Git reset mode:
--soft, --mixed, or--hard? - What is the difference between a tag and a branch?
- What is the difference between an annotated tag and a lightweight tag? Which do you usually want to use?
Task
- Create a new branch for this lesson as you normally do.
- On the lesson branch create a text file named
foo.txtin the root of your repository, containing the text “foot”. Note the spelling of the text in the file! - Create a text file named
bar.txtin the root of your repository, containing the text “bar”. - Add both the
foo.txtandbar.txtfiles to the Staging Area. - You decide that you're yet ready to commit
foo.txt, so remove it from the Staging Area. - Commit the staged file(s), which should only commit
bar.txt. - Edit the contents of the file
bar.txtfiles so that it contains the word “bart”. Note the spelling of the text in the file! - This was a mistake; discard your local modifications to the single file
bar.txtwithout disturbing the others. - You realize that you really wanted to commit
foo.txtinstead ofbar.txt, so revert your commit. - It looks like this is going to be difficult. Look back in your history and add a tag named “
pre-foobar” on the commit immediately before you originally addedbar.txt, just to mark where you started. - Add and commit
foo.txt. - You realize that you misspelled “
foo” as “foot”.- Edit
foo.txtto correct your mistake. - Add it to the staging area.
- Do a soft reset to the commit before the one with the misspelling.
- Perform your commit again.
- Edit
- It finally dawns on you that you want both files committed. Add the
bar.txtfile to the staging area and then commit using the --amend flag. This is a shorter form of the steps you took to correct the misspelling above. - Edit the contents of both the
foo.txtandbar.txtfiles so that they each contain the word “foobar”. - Decide that you would rather have the files contain “
foo” and “bar” as they did before, so do a hard reset to undo all your changes. - Add a tag “
foobar” to the last commit. - Backtrack to the commit with the
pre-foobartag and create a new branch namedfoo-toothere. You are creating a new branch on your lesson branch, not on themasterbranch. - Create a file named
foobar.txtin the root of your repository, containing the text “foobar”; add and commit that file. - Merge your
foo-toobranch into your lesson branch and then remove yourfoo-toobranch. - Push your lesson branch, including your tags, and create a merge request as normal.
After your merge request has been approved and your lesson branch has been merged, you may remove the “foobar” files you added in this lesson.
See Also
- Git Tools - Revision Selection (Pro Git, Second Edition)
- Carats and Tildes, Resets and Reverts (Erik Hinton)
- How to undo (almost) anything with Git (The GitHub Blog)
- Undoing Changes (Atlassian Git Tutorials)
- Reset, Checkout, and Revert (Atlassian Git Tutorials)
- Git Tools - Reset Demystified (Pro Git, Second Edition)
- Git Tip of the Week: Tags (Alex Blewitt)
- Git Basics - Tagging (Pro Git, Second Edition)
References
Acknowledgments
- Images are from Pro Git, Second Edition, licensed under the Creative Commons Attribution 3.0 Unported License.