Git Branching
Goals
- Understand the concepts behind Git branching.
- Create and delete branches.
- Merge branches using fast-forward and non-fast-forwarding merges.
- Experiment with merge requests.
Concepts
- branch
- branching
- check out
- conflict
- fast-forward merge
- feature branch
- fork
- merge
- merge request
- prune
- pull request
- tag
- topic branch
- tracking branch
Lesson
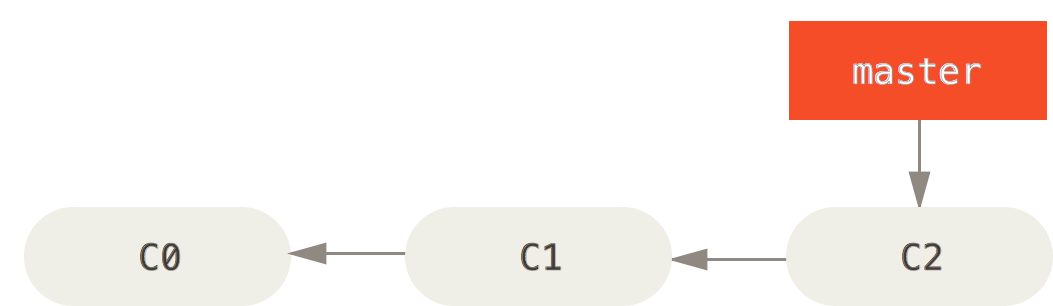
master branch in a local Git repository. (Pro Git, Second Edition)You've learned that there is a pointer at the end of your progression of committed snapshots in your local repository called master; this represents a branch of development. There is another pointer called HEAD pointing to master, indicating the position your next commit will go. You can list your local branches using the git branch --list command.
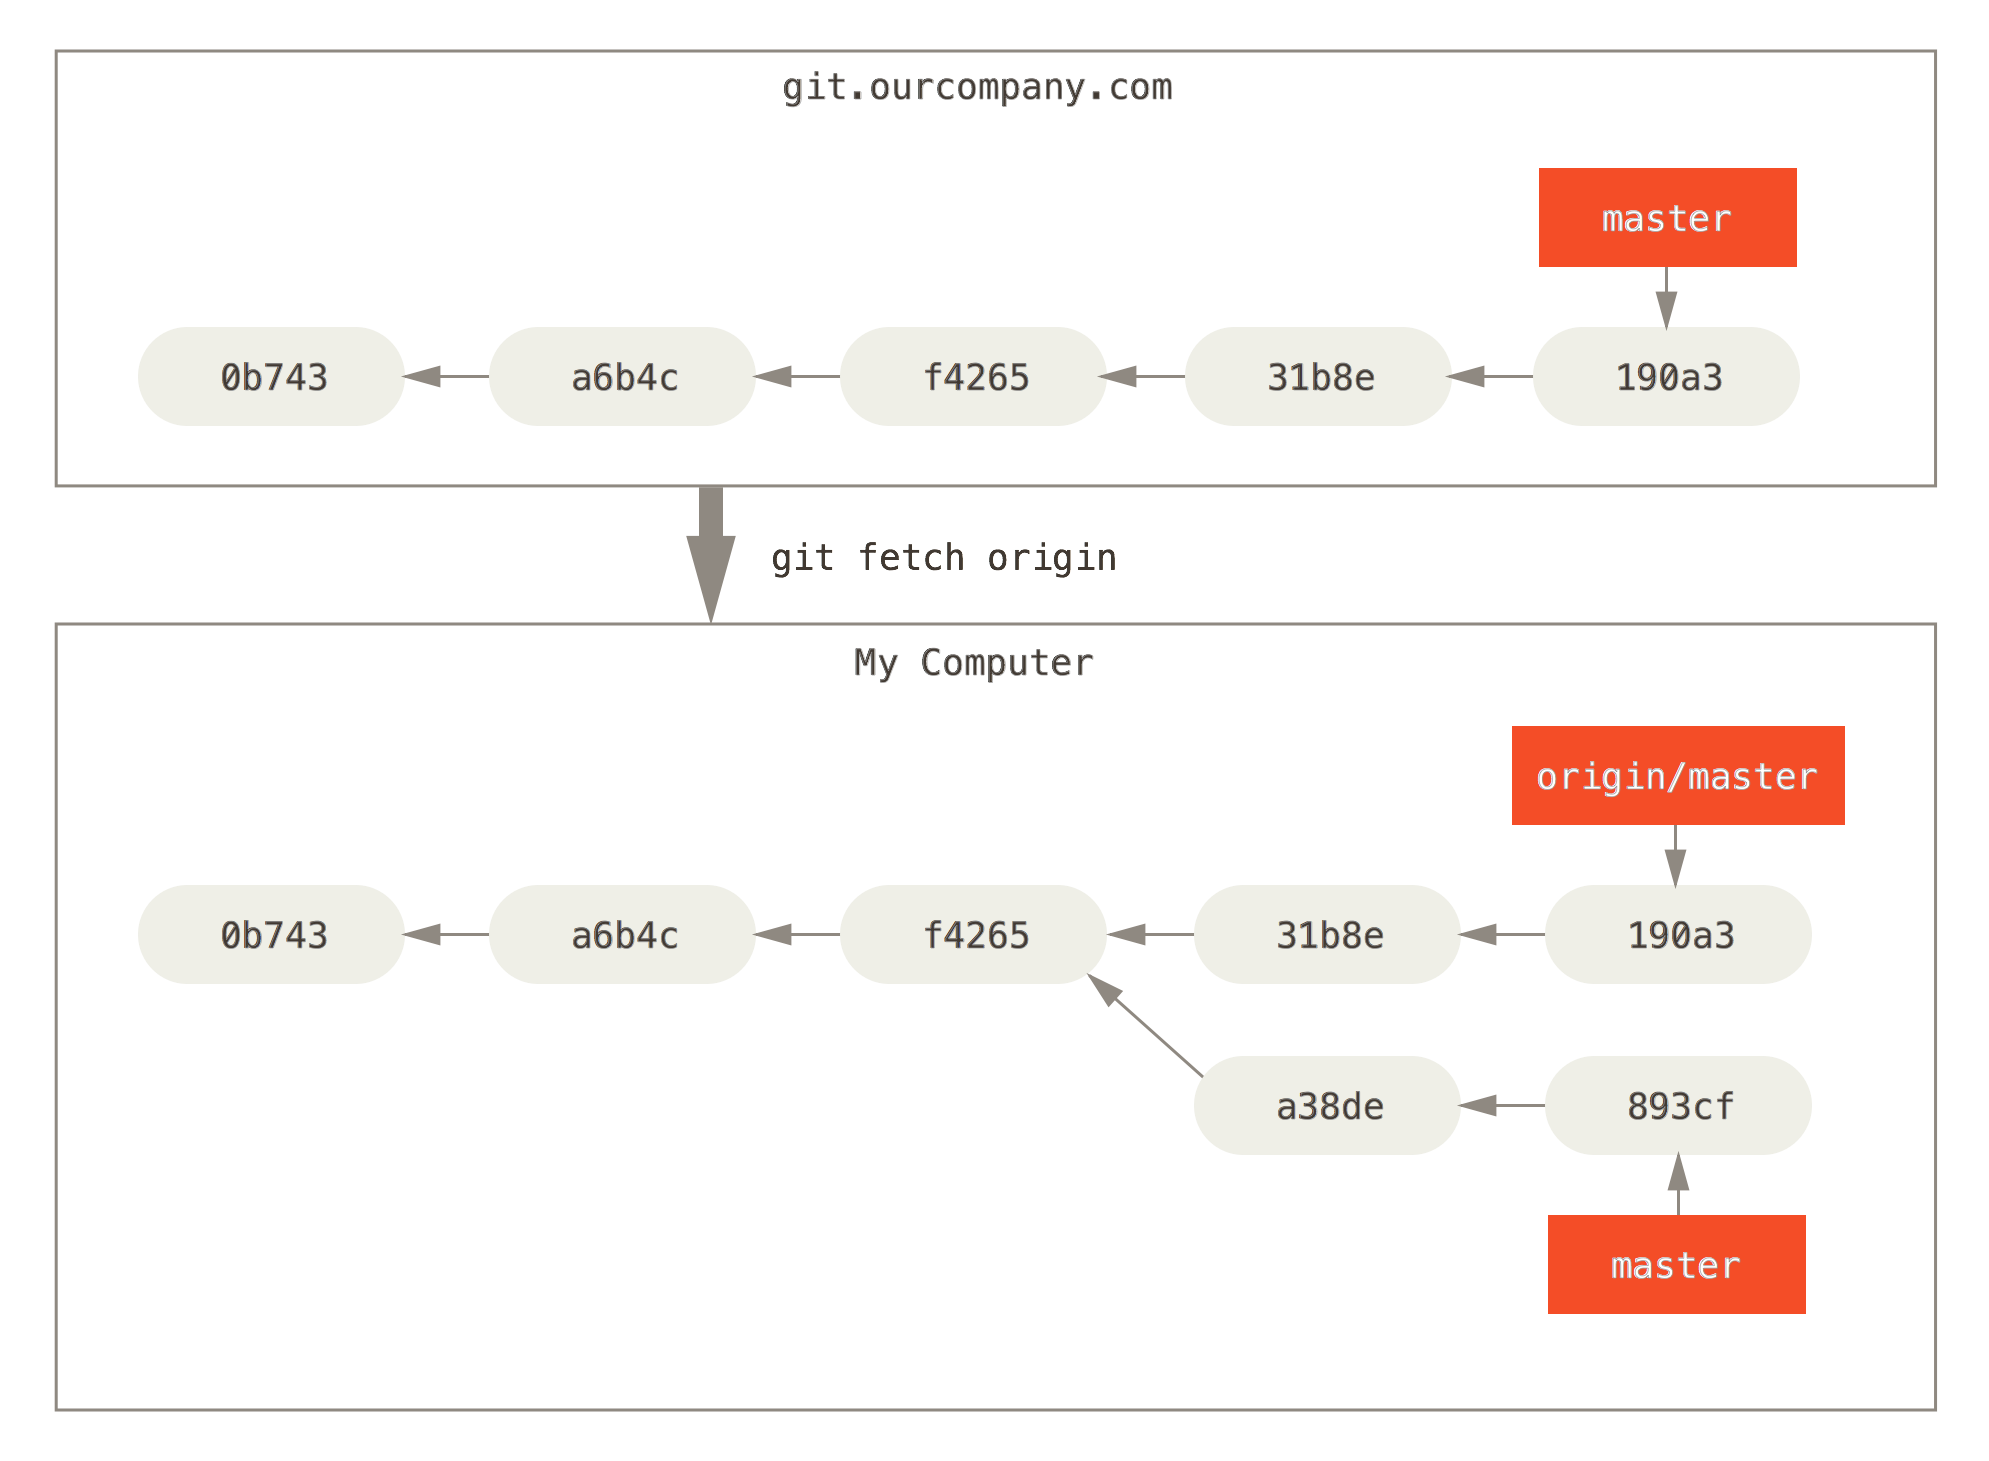
origin/master branch diverging from the local master branch. (Pro Git, Second Edition)When you work with a remote repository, you've seen that there is an origin/master branch which keeps track of the server's last-known commit. As you pull from the remote and do work locally, the master branch can get behind or ahead of the origin/master branch in the series of commits. You've even experimented with cases in which others make separate commits to the origin/master branch, so that when you pull the latest changes from the remote the two branches diverge as in the figure on the right, requiring that you merge them together with a new commit.
Branching
Git allows you to create other branch pointers besides master in your local repository. Like origin/master on the remote, your other local branches may get ahead or behind the master branch pointer. Also like origin/master, they may even diverge from the master branch and need a separate merge commit to bring them back together. Creating branch pointers and continuing development work from them is called branching. But why would you want to do such a thing?
It's often helpful to keep a related set of changes separate from the main development flow, to keep things from getting confusing. You may decide to work solely on one particular feature in a branch; this approach is called a feature branch, and it is probably the most popular reason for creating a new branch. Your project workflow might use branches for features, releases, and/or bug fixes. Relegating work on the feature to a separate branch provides several benefits:
- It allows you to go back to the main
masterbranch to do other work (such as a bug fix) without interfering with work on the new feature. - It allows you to create other branches for unrelated features or bug fixes, keeping that work separate as well.
- When working as a team you can commit changes without interfering with others working on the same code, or having their changes interfere with yours.
- The modifications on your separate branch can be pushed to the remote repository for others to use.
- Your changes can be shared with your team for their review and approval before being incorporated into the main master branch.
- Divergent branches keep an accurate history of which work was done separately on which features.
master branch and HEAD pointers. (Pro Git, Second Edition)After several of commits, you will wind up with a series of snapshots in your local repository. The master branch pointer will be pointing at the last snapshot. Likewise the HEAD pointer will be pointing at the same snapshot as the master branch pointer, indicating where the next commit will be placed. The figure on the right shows conceptual how these pieces relate.
Create a Branch: git branch <branch-name>
To create a new branch pointer, you can simply use the Git branch command, giving it the name of the new branch to create.
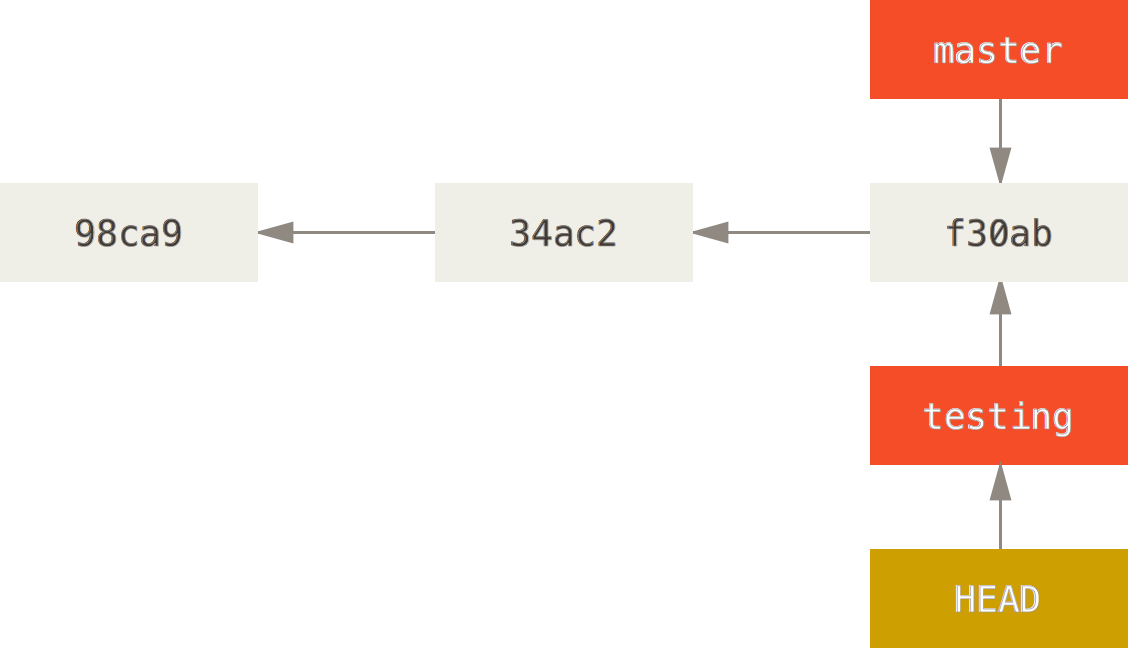
testing branch with the HEAD pointer still at the master branch. (Pro Git, Second Edition)In this example we'll create a branch named testing. Presumably the developer would use this branch for testing some new design or code rewrite without affecting the main development code until it's clear the new code works.
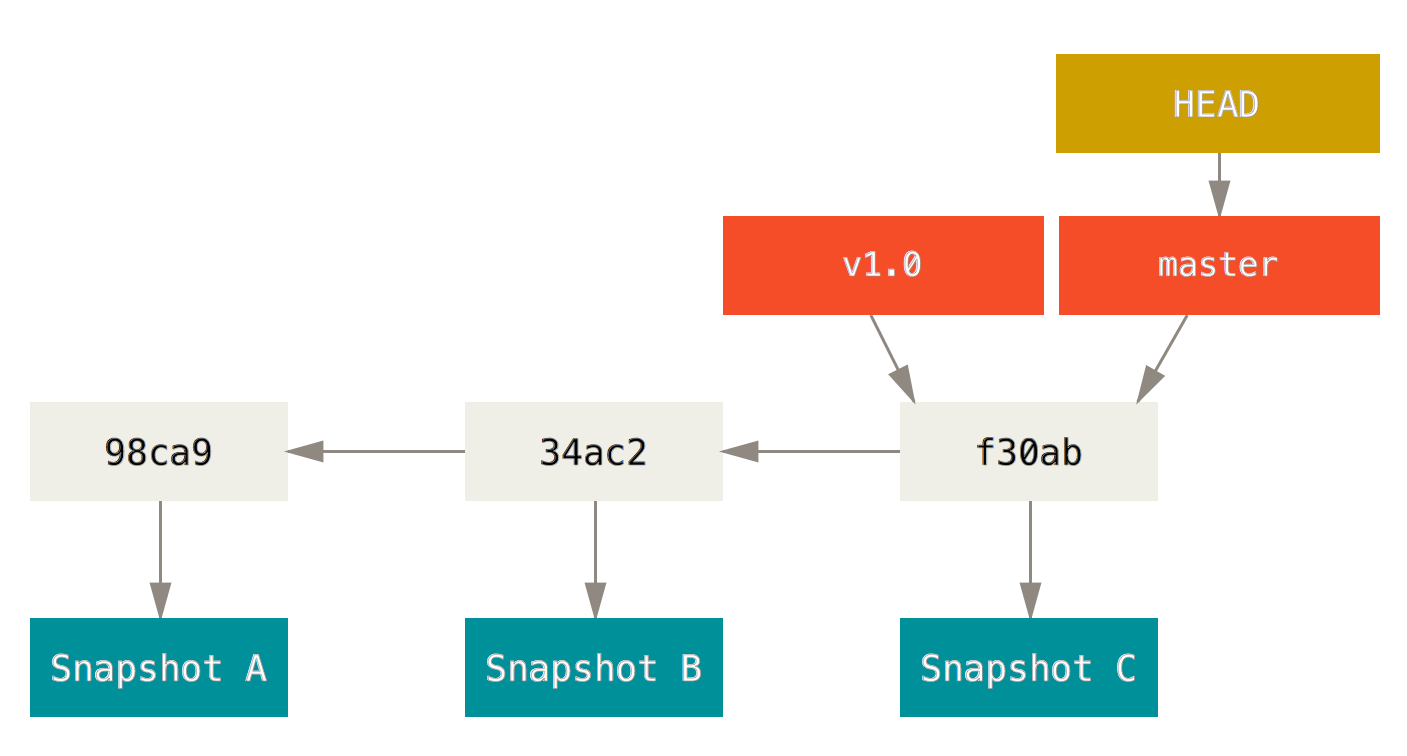
git branch testingThis will create a new branch pointer with the name testing, and it will be pointing to the same snapshot f30ab as our master branch. We have in effect created a new “branch” or “fork in the road” for our development stream.
But which path with we take going forward? Will further snapshots move the testing branch pointer forward or the master branch pointer forward? Notice that creating the new testing branch pointer did not move the HEAD pointer; it remains at master.
Switching Branches: git checkout <branch-name>
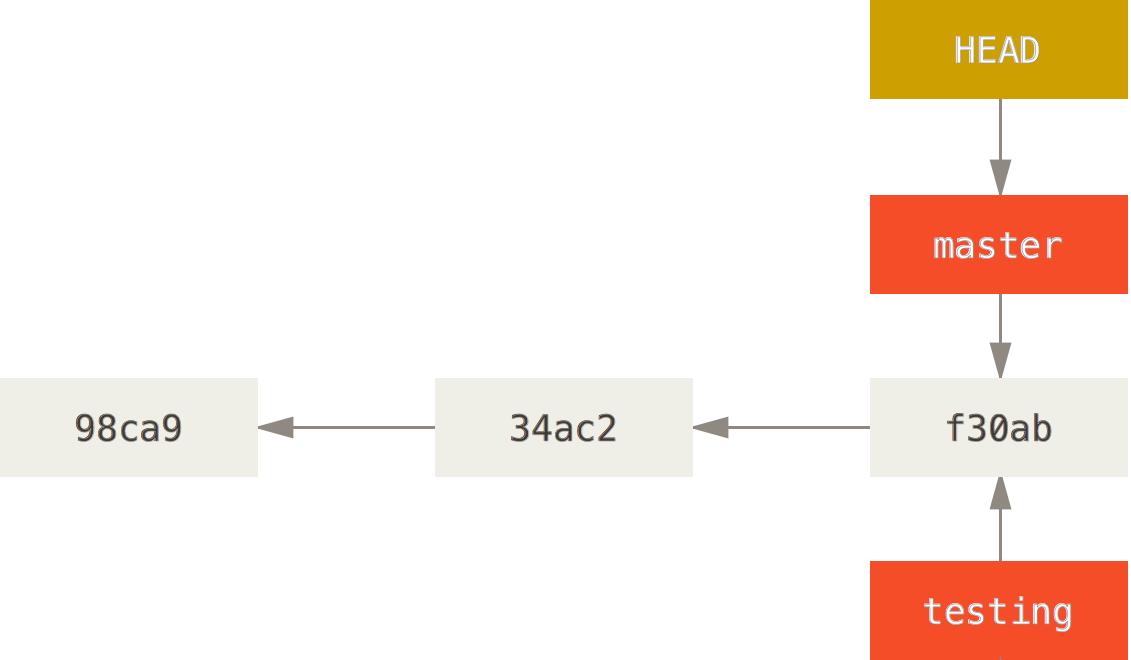
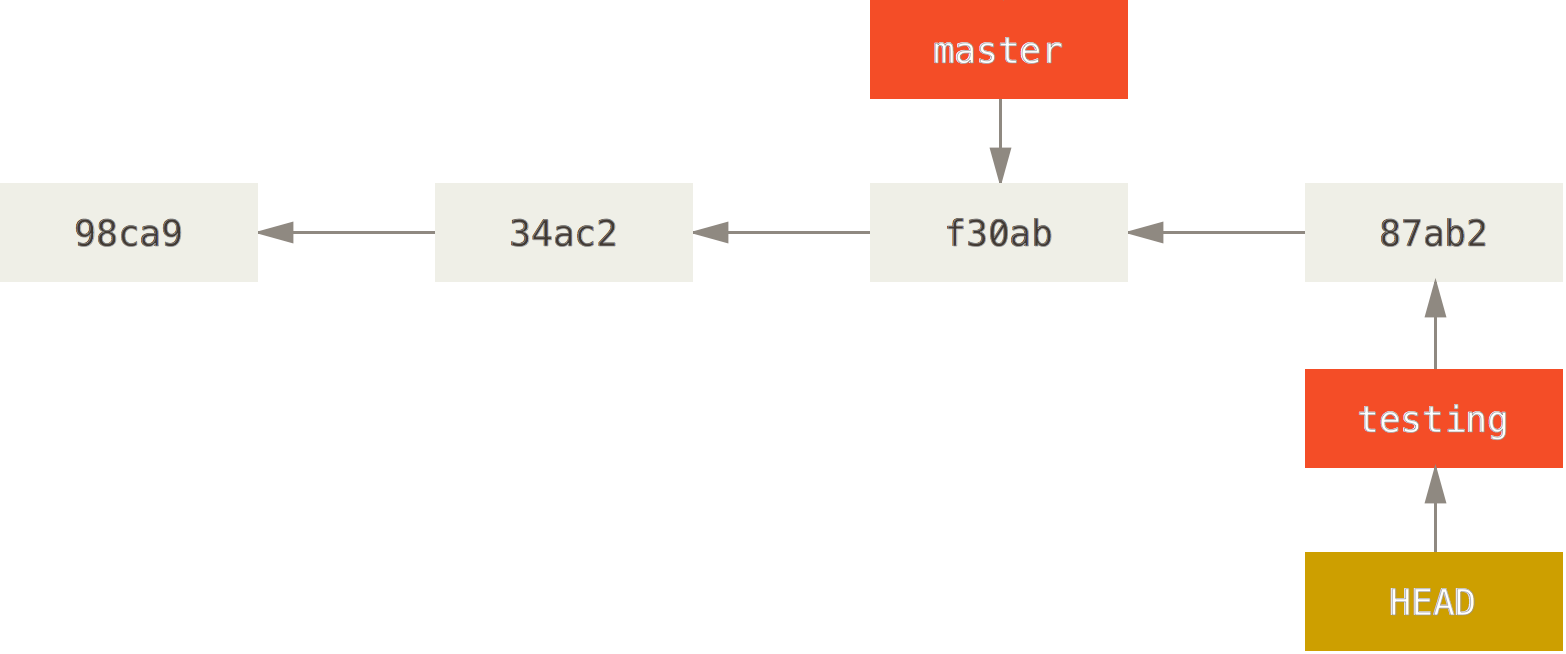
testing branch with the HEAD pointer moved using the checkout command. (Pro Git, Second Edition)For new commits to be placed on the testing branch (that is, for the testing branch pointer to move forward with new commits), you need to check out the new testing branch using git checkout.
git checkout testingThis will do two things:
- Place the contents of the
testingbranch into your Working Directory. - Move the
HEADpointer to thetestingbranch.
The diagram to the right shows the HEAD pointer at its new location after checking out the newly created testing branch.
Commit to a Branch: git commit
testing branch having moved ahead of the master branch. (Pro Git, Second Edition)Committing to a new branch is no different than committing to the main master branch; what matter is that the HEAD pointer has been set to the new branch using the checkout command.
git commitOnce a snapshot has been added using git commit, the branch that HEAD points to will advance, as shown in the figure with the new snapshot 87ab2. The master branch pointer will be left behind pointing to the same snapshot to which it had pointed before; only development on the testing branch has advanced.
Working on Multiple Branches
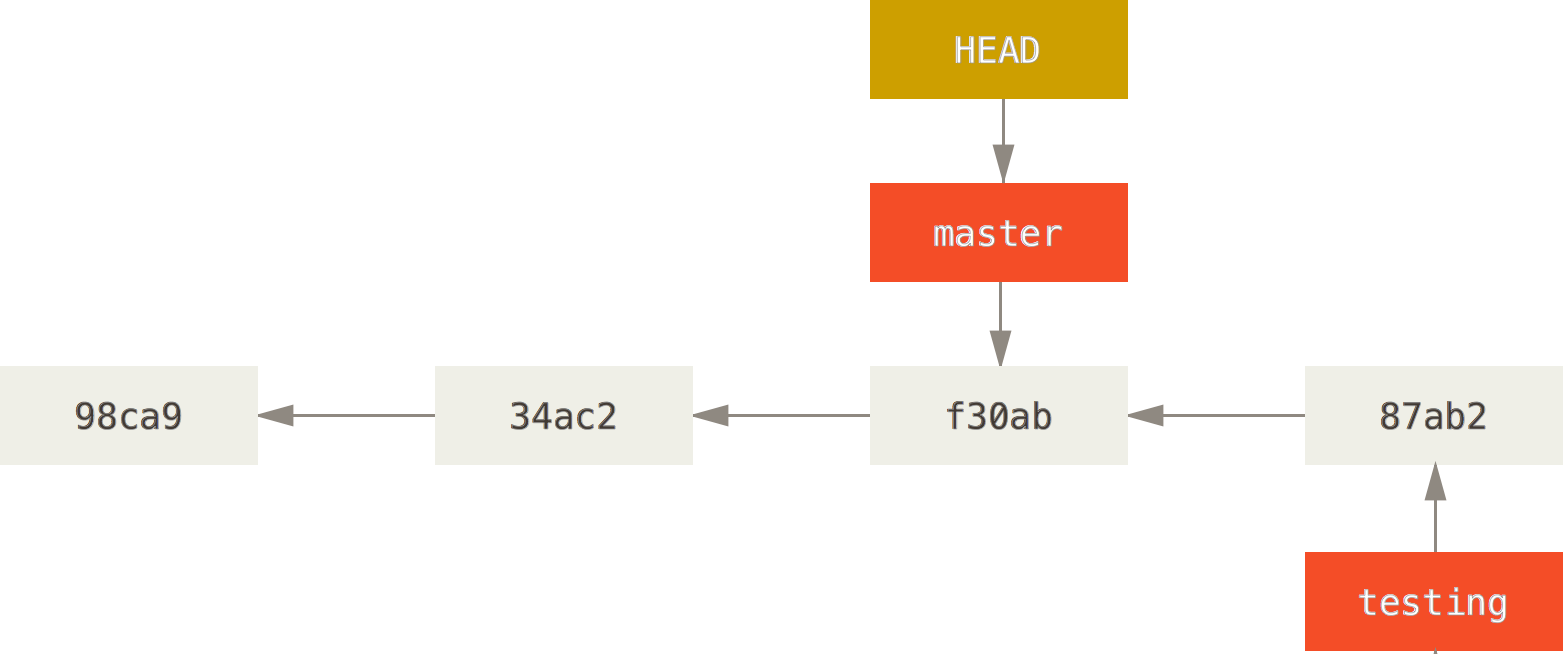
checkout command to move HEAD back to master again after having worked on the testing branch. (Pro Git, Second Edition)One of the benefits of branching is that at any time one can stop work on a branch and switch back to another branch to continue work there. Moving HEAD back to master is just as simple as moving it to testing in the first place: just issue another git checkout command.
git checkout masterThis will update your Working Directory with the contents of the snapshot f30ab which master is still pointing to, and move the HEAD pointer back to point to master as shown in the figure on the left.
Diverging Branches
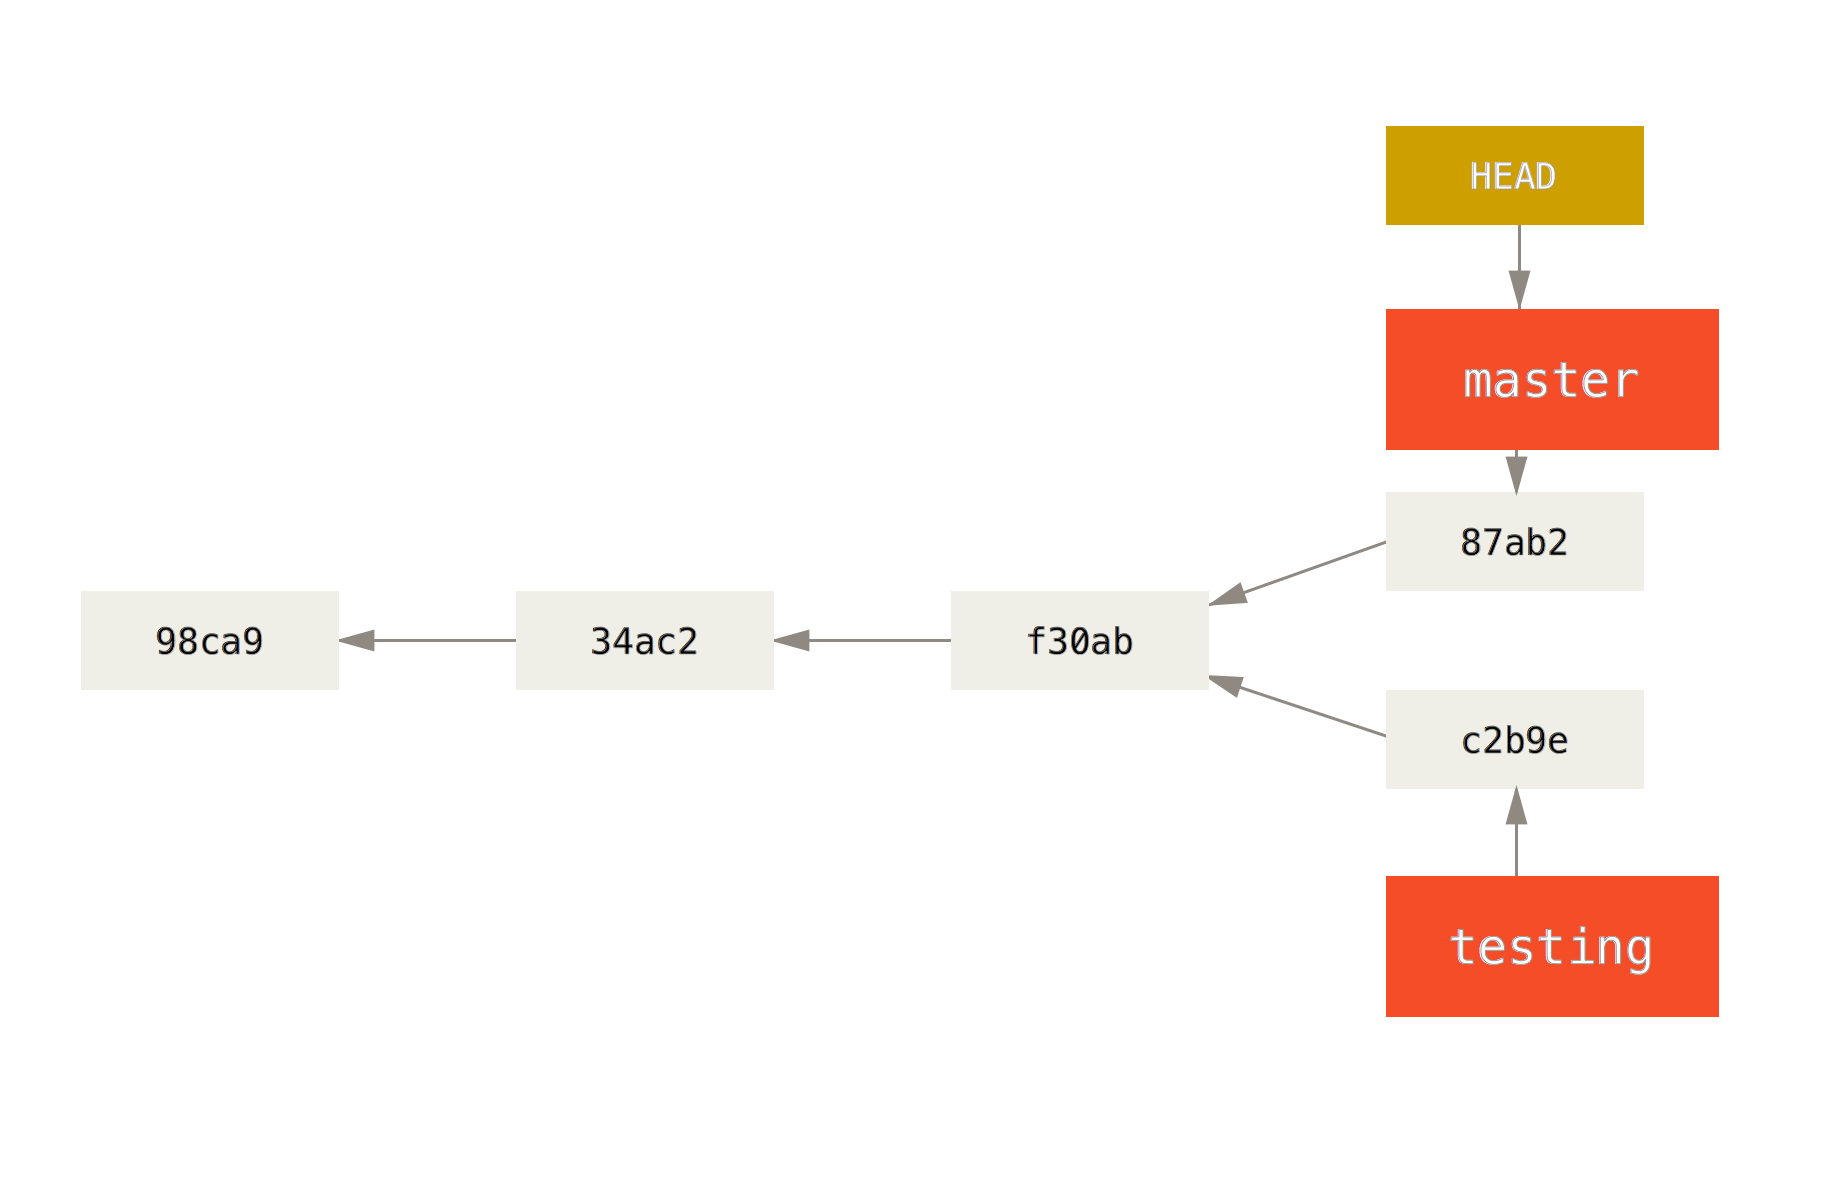
master branch, diverging from the testing branch. (Pro Git, Second Edition)The situation gets more information if you now start committing changes to the master branch, as shown by the 87ab2 snapshot in the figure on the right. The history behind the two branch pointers master and testing will diverge. Git doesn't care that these two development streams have diverged; all Git is concerned with is moving the branch pointed to by HEAD each time a commit is made.
Merging
The development team, on the other hand, probably cares that there are multiple development streams. At some point they will want to reintegrate or merge the changes from a branch back into the main development streams. How straightforward this merging process will be will depends on various factors, such as whether the development streams have merged and whether the changes are compatible.
There are two essential steps to perform when merging:
- Switch to the branch you want to merge into using
git checkout. You will often merge intomasterbranch. Example:git checkout master - Merge the other branch into the current one using
git merge. Example:git merge testing
Fast-Forward Merges

iss53 branch pointer ahead of master, with no additional work having been done on master after iss53 was created. (Pro Git, Second Edition)The simplest type of merge, and the one you will encounter most often when working alone, is the fast-forward merge, which you learned about when first working with remote repositories. In this configuration, the two branches have not diverged; one branch pointer has simply advanced ahead of the other. This might happen if you have performed work on a new branch but have not made any changes on master. In this case, merging into master is simply a matter of moving the master pointer forward to match the other branch pointer.
Consider for example that your software has a bug, and that someone has described this issue and given it an identifier of iss53 in some defect-tracking database. (You will learn about tools for tracking defects and other issues in upcoming lessons.) You create a branch named iss53 and make a single commit to that branch, fixing the bug.
This situation is illustrated in the figure on the left. The iss53 branch has commit C3, but the master branch pointer is still at commit C2. To merge the iss53 branch into master (that is, to integrate your iss53 bug fix into the main development stream), Git merely needs to move the master pointer to C3 alongside the iss53 branch pointer.
iss53 branch into the master branch.git checkout master
git merge iss53Because no independent work has been done on the master branch, Git will perform a fast-forward merge automatically.
Non-Fast-Forward Merges
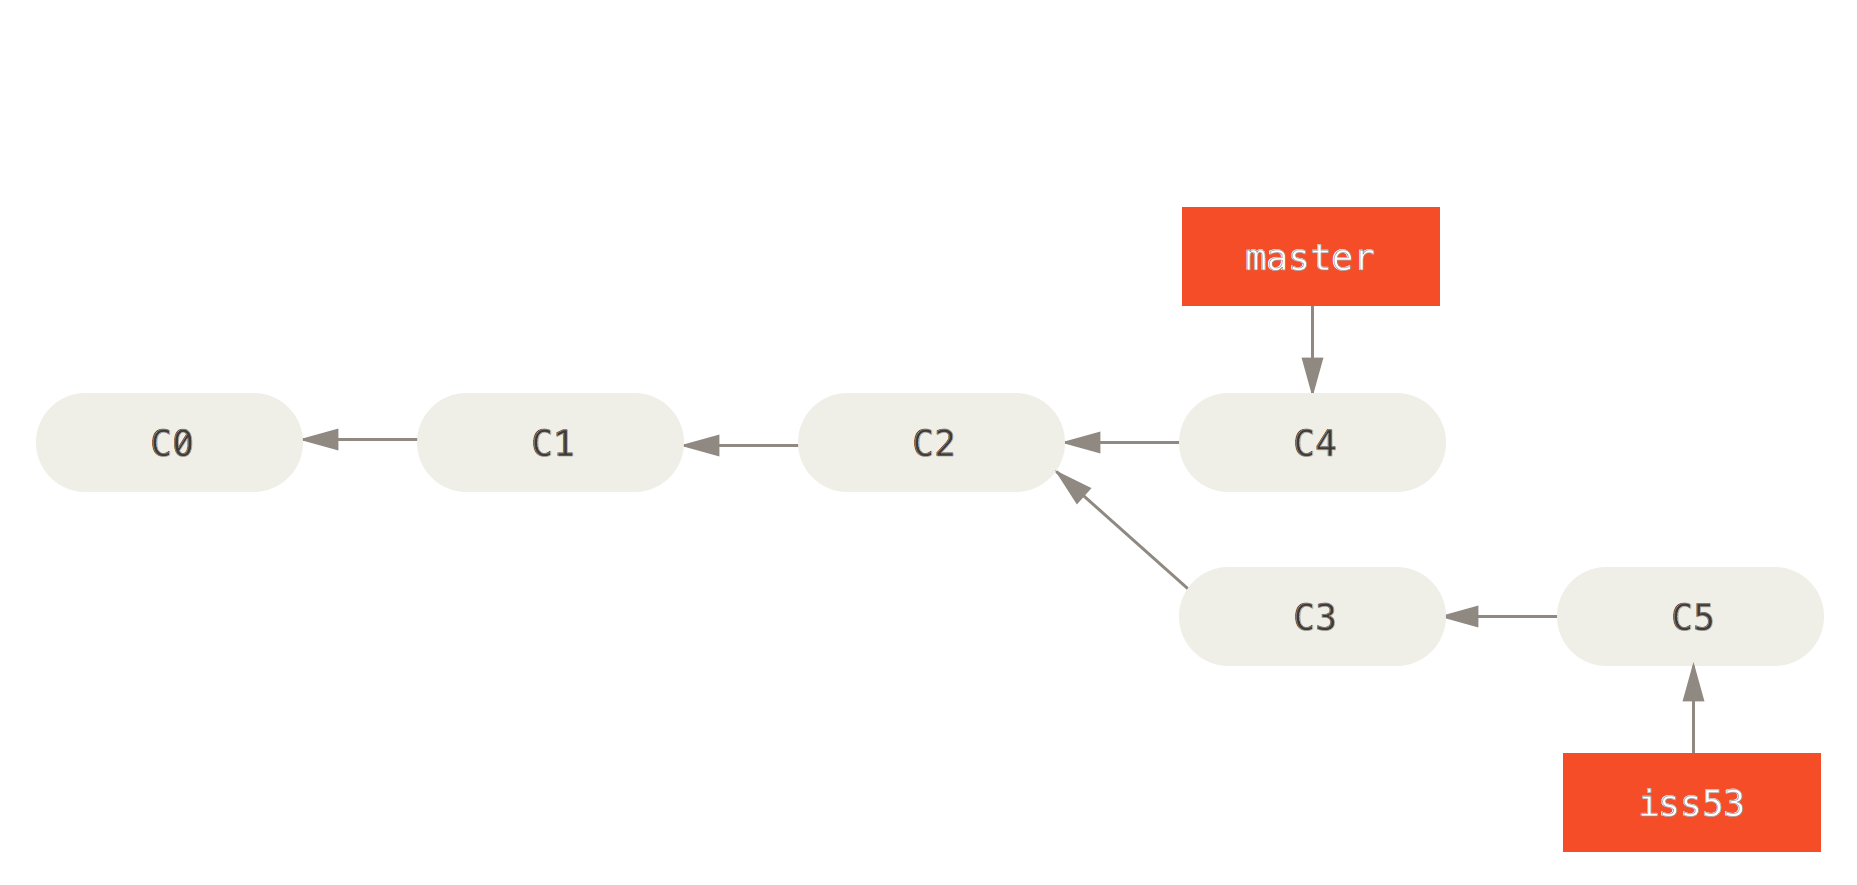
master branch before merging in the iss53 branch. (Pro Git, Second Edition)But consider what would happen if work had continued on the master branch at the same time work continued on iss53. The two branches will have diverged from their common ancestor commit C2; the master branch pointer will be at commit C4, while the iss53 branch pointer will be at commit C5, as illustrated in the figure on the right. The same commands would be used to merge these two branches as would be used with a fast-forward merge.
iss53 branch into the master branch.git checkout master
git merge iss53The difference in this case that Git would no longer be able to perform the merge simply by moving one of the pointers forward. To merge the two streams, Git must create another commit that combines the latest changes in the master and in iss53 branches!
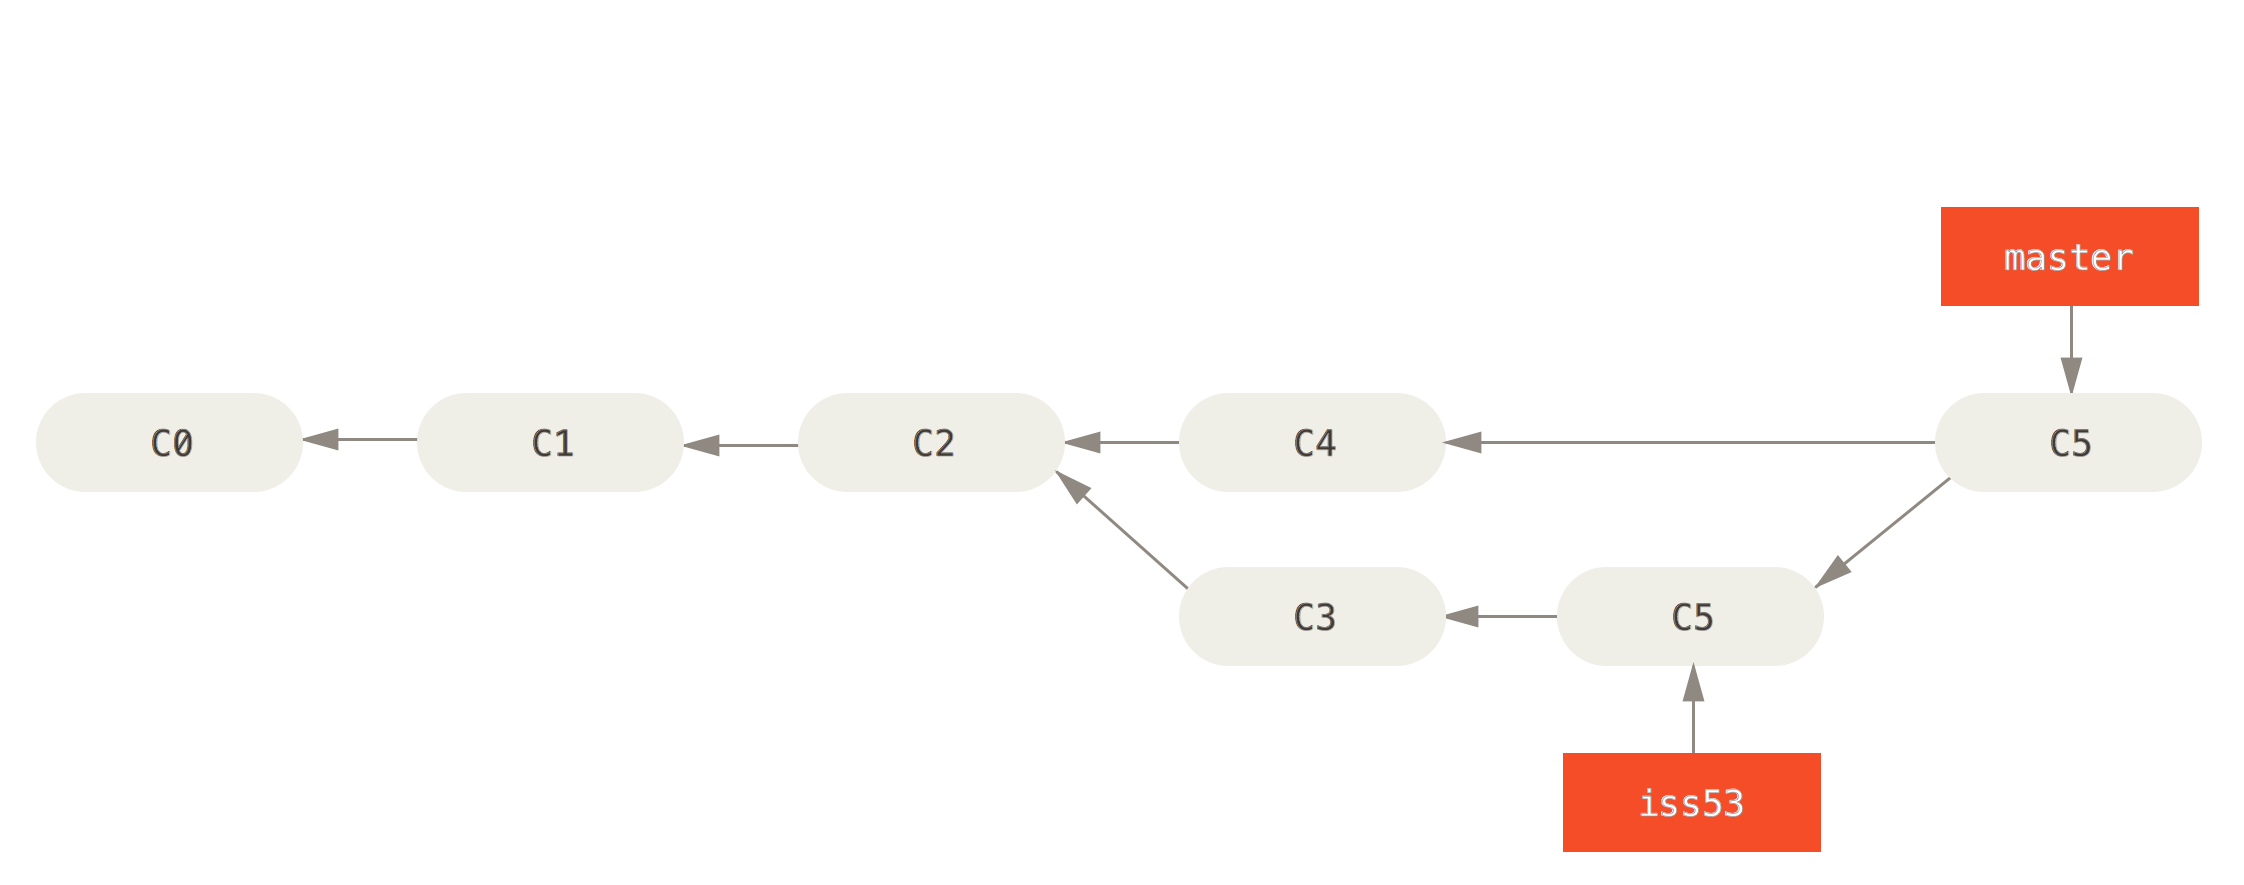
iss53 branch into master. (Pro Git, Second Edition)The new situation after the merge is shown in the following figure on the right. An additional commit C6 has been added to merge the two branches together. Note that only the current branch pointer master as been advanced to the new commit. The branch being merged in, iss53, did not change; it still points to its last commit C5. If further work were to be done on the iss53 branch, those commit would be placed after C5 but would not be incorporated into the master branch until the iss53 branch was merged again.
Merge Conflicts
In a previous lesson you used git merge origin/master to merge the remote repository's origin/master branch into your local master branch. When merging origin/master branch works like any branch you have created locally. (You will learn about branches that stay updated with the remote repository under Remote Branches below.) You have already seen that if the remote changes at origin/master are incompatible with your changes at master, it causes conflict that you must resolve.
When you merge changes from your own local branch (e.g. using git merge iss53 as is shown above), the merge process will happen exactly as if you were merging origin/master. If Git is unable to merge conflicts automatically, you will need to resolve the conflicts manually and commit a new merge revision. The files with conflicts (which Git will list for you when the merge fails) will contain merge markers indicating which variations were incompatible:
<<<<<<< HEAD
        System.out.println("How are you this afternoon?");
=======
        System.out.println("How are you today?");
>>>>>>> 65b2e16ab1f92fd60aeaf6da8bb7e3b1d162afc7
To resolve these conflicts, decide which of the variations you wish to keep. Edit the offending file(s), and when you are done, remove the lines with the <<<<<<<, =======, and >>>>>>> markers. Then just add the file(s) to the Staging Area and make a new commit as you normally would.
Branch Maintenance
Delete a Branch: git branch --delete <branch-name>
Once you've merged a branch back into master, do have the option of deleting the branch pointer. First you might ask yourself whether you're really finished with work on that branch. Is the bug really fixed? If someone later finds that the fix only accounted for 99% of the cases but you missed one, you'll have to go back and do more work. It would be good if further related work were done on the same branch and merged into master again, so it might be good to keep the branch around for a while longer.
If you're sure you want to delete a local branch, you can delete it using the --delete flag with the git branch command.
iss53 branch.git branch --delete iss53Remote Branches
Push Branch to Remote: git push <remote-name> <branch-name>
With no further action on your part, the branches you create in your local repository will never make it to remote repository. You'll have to push branches to the remote repository. From working with remote repositories you already know that you can push your master branch to the remote.
master branch to the remote repository.git push origin masterYou may also remember that when initializing your repository and pushing for the first time, you needed to use the --set-upstream or -u flag so that your local master branch would “track” the corresponding branch on the server.
master branch to the remote repository.git push --set-upstream origin masterPushing your new branch to the remote repository works the same way—Git treats master and iss53 the same way. If this is the first time you are pushing your local branch to the remote repository, make sure you make your local branch a tracking branch using the --set-upstream or -u flag.
iss53 branch to the remote repository.git push --set-upstream origin iss53After the initial push you will be able to push your iss53 branch to the remote just as you did with master:
iss53 branch to the remote repository.git push origin iss53Track Remote Branch: git checkout --track <remote-name>/<branch-name>
If others on your team have pushed their branches to the remote, when you issue a git pull you'll get a pointer to those remote branches in the form origin/branch-name. For example, if a team member pushes an iss64 branch, you will pull an origin/iss64 branch pointer that will be updated with subsequent pulls. But you will not have a local iss64 branch that you can work on in your local repository that will automatically be updated with the one on origin. To achieve this, you'll need to explicitly check out the branch and indicate that you want to “track” it locally:
iss64 tracking origin/iss64 on the remote repository.git checkout --track origin/iss64This will create a new local tracking branch iss64 which will follow changes in origin/iss64 when you push and pull. In other words, it will be have the same relationship as the master and origin/master branches do.
Delete Remote Branch: git push origin --delete <branch-name>
If you no longer want a branch on the remote repository, include --delete branch-name when you next push. For example here is how you remote the iss64 branch pointer from the server.
origin/iss64.git push origin --delete iss64git remote prune originMerge Requests
Branches are used in various ways in various workflows depending on the project and team involved. One useful tool that can be used with branches is a merge request. A merge request is a request for your changes to be merged into some other repository or branch, and for others in your team to review and comment on the request before the merge takes place. This feature not part of Git per se, although it uses Git under the hood to make it work.
Although the workflows vary, the typical process on GitLab using branches proceeds as follows:
- A developer creates a feature branch in his/her local repository.
- The developer pushes the branch to the remote repository on GitLab.
- The developer files a merge request from the GitLab web site.
- The team reviews the code and discusses it.
- If changes need to be made, the developer makes additional commits to the branch and pushes them, which updates the merge request.
- After the team members mark their approval, the project administrator merges the changes into the GitLab repository and closes the merge request.
More detailed discussion can be found in the See Also and References sections.
Review
Summary
| Command | Description | Example |
|---|---|---|
| Local Repositories | ||
git init | Initializes the current directory as a Git project with a Working Area, Staging Area, and Local Repository. | git init |
git add <file> | Adds a file to the Staging Area but does not commit it to the Local Repository. The added file must be committed before the Repository is changed. | git add readme.txt |
git reset <file> | Removes a file from the Staging Area that has not yet been committed. | git reset readme.txt |
git status | Shows the status of the files in the Working Directory. | git status |
git diff [--staged] | Shows differences between the Working Directory and the Staging Area; or if --staged is included, between files in the Staging Area and the Repository. | git diff |
git commit [--all|-a] --message|-m <"log-msg"> | Commits all files in the Staging Area to the Repository, optionally first adding modified files if --all (-a) is included | git commit -m "log message goes here" |
git log [<file>] | Shows history of commit log messages for the Repository, or for a single file. | git log |
git rm <file> | Removes a file from the Working Directory and from the Staging Area. Equivalent to manually removing a file from the Working Directory and then using git add for the removed file. The removal must be committed before the Repository is changed. | git rm readme.txt |
git bundle create <file> --all | Creates an archive file of the entire history of Local Repository. | git bundle create repo.bundle --all |
| Remote Repositories | ||
git clone <remote-url> [<directory>] | Downloads a copy of an entire remote repository and installs it in a local repository. | git clone https://username@gitlab.com/username/project.git |
git remote [--verbose|-v] | Lists remote repositories | git remote |
git remote add <remote-name> <url> | Adds a remote repository and gives it a name. | git remote add origin https://username@gitlab.com/username/project.git |
git fetch [<remote-name>] | Retrieves latest changes from the remote repository, but does not merge it into current version. | git fetch origin |
git pull [<remote-name>] | Performs a combination of fetching from the remote repository and merging the retrieved commits into the current local branch. | git pull origin |
git push [--set-upstream|u] [<remote-name>] [<branch-name>|--all|--tags] | Pushes the latest commits on the named branch to the indicated remote repository, optionally setting up the branch to track the remote branch. You can also specify that all branches or tags should be pushed. | git push origin master |
| Branches | ||
git branch [--list] [--remotes|-r] | Lists all local or remote branches. | git branch --remotes |
git branch <branch-name> | Creates a new branch. | git branch testing |
git branch --delete|-d <branch-name> | Deletes a branch. | git branch -d testing |
git checkout [-b] <branch-name> | Switches to a branch; optionally creates the branch as well if -b is given. If -b is not given, if the branch doesn't exist locally but there is a remote branch with a matching name, this becomes the equivalent of git checkout -b <branch> --track <remote>/<branch>. | git checkout testing |
git checkout --track <remote-name>/<branch-name> | Checks out and tracks a remote branch | git checkout --track origin/testing |
git merge [<branch-name>] | Merges changes from another branch into the current local branch. | git merge origin/master |
git push [--set-upstream|u] [<remote-name>] [<branch-name>|--all|--tags] | Pushes the latest commits on the named branch to the indicated remote repository, optionally setting up the branch to track the remote branch. You can also specify that all branches or tags should be pushed. | git push origin master |
git push origin --delete|-d <branch-name> | Deletes a remote branch. | git push origin -d testing |
git remote prune <remote-name> | Removes all local references to remotes branches that no longer exist. | git remote prune origin |
Gotchas
- Switching to a new branch could change files your Working Directory based upon the new branch, so don't forget to commit any modified files first.
- Remember that before merging you need first to switch to the branch you intend to merge into.
In the Real World
- Many open-source projects on GitLab and other repository hosting services do not allow you to push directly to the repository. You will usually first need to create a branch and then create a merge request, and many projects even require that you fork the project first.
Think About It
- Before deleting a branch, think about whether you might need to do more work on that branch.
Self Evaluation
- What does it mean to say that in Git “branches are cheap”?
- If you merge branch
Binto branchA, which branch pointer will move? - What is a merge request? Where and how do you initiate one?
- What term do some remote repository services use that means the same as “merge request”?
Task
First create a branch for this lesson to update your POM and merge it into the master branch.
- Create a branch in the form
lessons/x.xwherex.xis the current lesson number. - On the new branch update your POM version to
x.x-SNAPSHOT, wherex.xis the current lesson number. - Switch back to the
masterbranch and make an unrelated change such adding a comment to the application class. - Merge in the
lessons/x.xbranch tomaster. - Push your changes to GitLab; this will show evidence of separate, merged work. (You do not need to push your
lessons/x.xbranch at this point, although you may if you wish.)
Now update the branch for this lesson with a final POM, and make a corresponding merge request on GiLab.
- Switch back to your
lessons/x.xbranch and change the POM version tox.x, wherex.xis the current lesson number. - Create a merge request on GitLab for your
lessons/x.xbranch. Add your teacher as an “approver”. - After your teacher has reviewed and approved the merge request, merge the
lessons/x.xbranch using the GitLab web interface, selecting the option to remove the source branch. - In your local repository prune the server's
lessons/x.xbranch. - Delete the
lessons/x.xbranch from your local repository.
See Also
- Branches in a Nutshell (Pro Git, Second Edition)
- Remote Branches (Pro Git, Second Edition)
- Using Branches (Atlassian Git Tutorials)
- GitLab: How to create a merge request (GitLab Docs)
- Creating a Branch (GitHowTo)
- Navigating Branches (GitHowTo)
- Merging (GitHowTo)
- Remote branches (GitHowTo)
- Adding a tracking branch (GitHowTo)
- A successful Git branching model (Vincent Driessen)
- Introduction to GitLab Flow (GitLab Docs)
References
- GitLab: Merge requests (GitLab Docs)
- Bitbucket: Work with pull requests (Atlassian Documentation)
- GitHub: Using pull requests (GiHub Help)
Acknowledgments
- Images are from Pro Git, Second Edition, licensed under the Creative Commons Attribution 3.0 Unported License.