Git
Goals
- Understand basic version control concepts.
- Put a project under version control with Git.
- Make working directory changes, stage them, and commit them to a Git repository.
- See the version control status of all files.
Concepts
- alias
- blame
- branch
- carriage return (CR)
- checksum
- commit
- diff
- distributed
- Git
- history
- Index (Git)
- initialize
- line feed (LF)
- local repository
- log message
- merge
- newline
- pull
- push
- remote repository
- revision
- snapshot
- stage
- Staging Area (Git)
- unstage
- version control system
- version tracking
Preparation
- Download and install Git. A patched version such as
v2.17.2or greater;v2.18.1or greater; orv2.19.1or greater; is highly recommended to address security vulnerability CVE-2018-17456.- Set your username for Git using:
git config --global user.name "My Name" - Set your email for Git using:
git config --global user.email "my.email@example.com" - Configure line endings for your platform:
- Windows
git config --global core.autocrlf true- Linux / Mac
git config --global core.autocrlf input
- Set your username for Git using:
Configuring User Information
Before you start using Git, you will need to configure the name and email address you want to use. This information will be attached to the data you store with Git in order to identify the person making changes. Enter the following command, substituting your name and email. You can see the changes in the .gitconfig file in the user's home directory.
git config --global user.name "My Name"
git config --global user.email "my.email@example.com"Configuring Line Endings
Much of the information stored by Git will be in the form of text such as Java source code. Through one of the many convoluted turns of the history of computing, Windows and Unix-based platforms developed independent ways of representing newlines, the invisible control characters that mark the ends of lines. Windows machines use a carriage return (CR) control character followed by a line feed (LF) control character, often written as CRLF. Unix-based systems (Linux and modern Mac) use a single LF to represent a newline. When system using different newlines edit the same file, problems can occur. See The Great Newline Schism.
There are many ways to configure Git to allow developers with different systems to work together. One of the most common, the approach used in these lessons, is to instruct Git to store all information ultimately using LF line endings using the core.autocrlf setting. The following configuration will allow Windows machines to continue using CRLF locally, but to convert automatically to LF line endings when sharing information with others. The configuration for Linux will maintain the native LF line endings.
git config --global core.autocrlf truegit config --global core.autocrlf inputLesson
Version Control
A version control system is essential for working on a software project, even if you are the only developer. Primarily a version control system keeps track of a “history” of file modifications over time. If you inadvertently make a change to a file, or for whatever reason you decide later you don't like a change you made, you can always revert back to an earlier version. But modern source control systems such as Git and Subversion have much more capabilities, especially when working as a team. Here are some terms you'll encounter, with an explanation of the need they address:
- version tracking
Give me back a previous version of my file(s), before my recent changes.
- history
Show me all the revisions I've ever made to my file(s).
- diff
How is the current version of my file(s) different from one of the previous versions?
- commit
I'm happy with the changes I've made to my file(s). Let me save this version so that I can go back to it later.
- blame
Who changed this line of this file? When? In which revision?
- branch
I want to go off and try something experimental with my file(s).
- merge
I want to add in Jane's and John's changes to my files. I also want to incorporate those experimental changes I was doing in parallel.
- local repository
I want to store all files under revision control on my computer.
- remote repository
I want there to be some place where we can store all the files and their history; and where I can share changes with others on my team.
- pull
I want to get all the latest changes from the remote repository.
- push
I want to send my recent changes to the remote repository.
Git
Git is now the most popular version control system. It is distributed, which means that although you can set up and interact with a remote repository for your team, your local repository will keep track of the entire history of your files. You can use your local repository offline and never publish to a remote repository, if you don't want to.
Three Storage Areas
When your project is under version control with Git, there are actually three separate areas you'll be working with locally, not counting one or more optional remote repositories.
| Working Directory | These are normal files in your project directory. They would have been here anyway, even if you weren't using version control. |
|---|---|
| Staging Area | This is like a “waiting room” for your files. These are the files you plan to store in the Repository. If these files are already in the repository, the files in the Staging Area represent the changes you want to make. The Staging Area is also called the Index. |
| (Local) Repository | All your versions—the complete history of every commit you've ever made—is stored here. Behind the scenes, the Repository is stored along with the Staging Area in your project's .git directory, which is usually hidden. |
| Remote Repository |
You may not have a Remote Repository, or you may have various Remote Repositories you pull from and/or push to. When you choose to push or pull to one of them is up to you. If you wanted to, you could use your Local Repository forever and never interact with a Remote Repository. (You wouldn't be a very good team player in this case, though.) |
Snapshots
Each time you store or “check in” another version, Git makes a snapshot of your entire repository, even those files that have not changed. Over time, this starts to look like a chain of different snapshots, also called revisions.
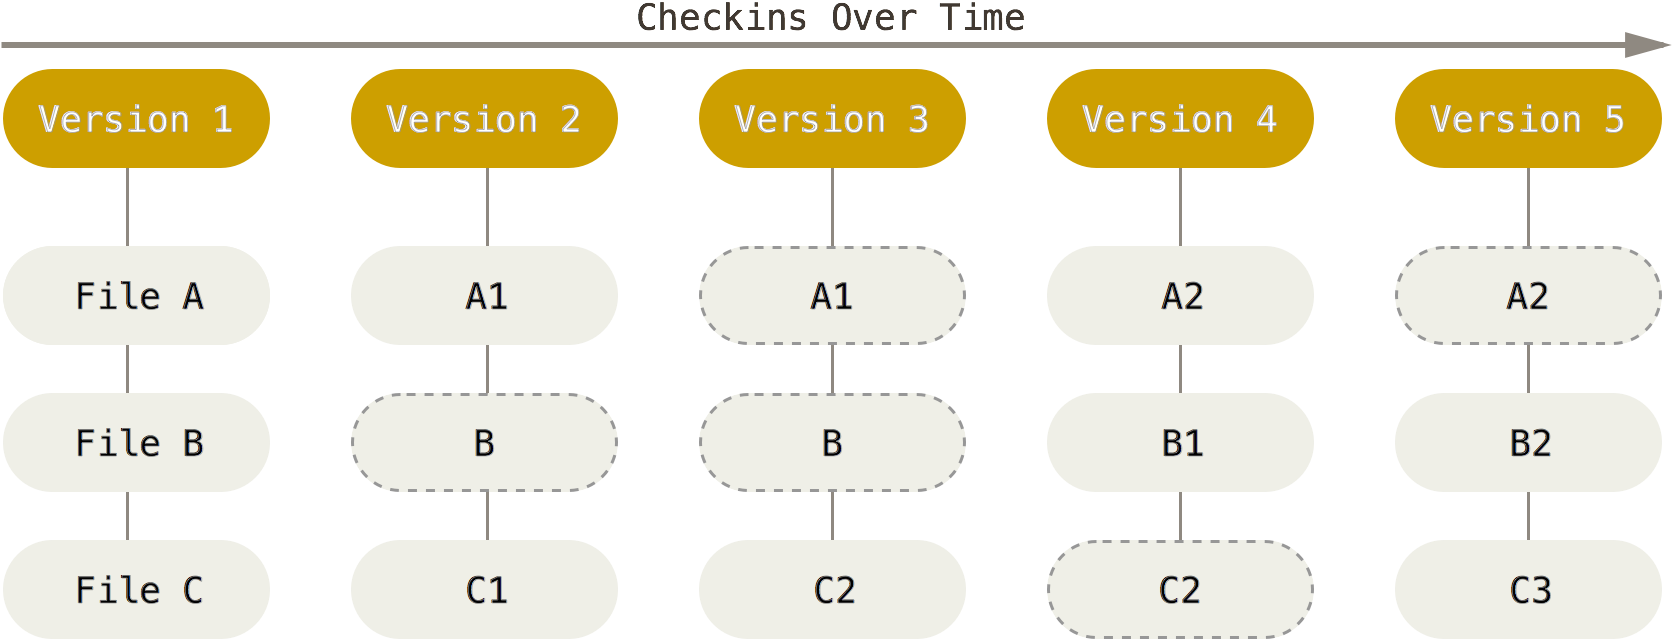
Each revision (or snapshot) is identified by a sequence of 40 hexadecimal characters called a checksum, generated using the SHA-1 algorithm. If you want to do something with a particular revision, you'll use the checksum ID to tell Git which revision you're talking about. How many bits does the revision checksum represent?
Workflow
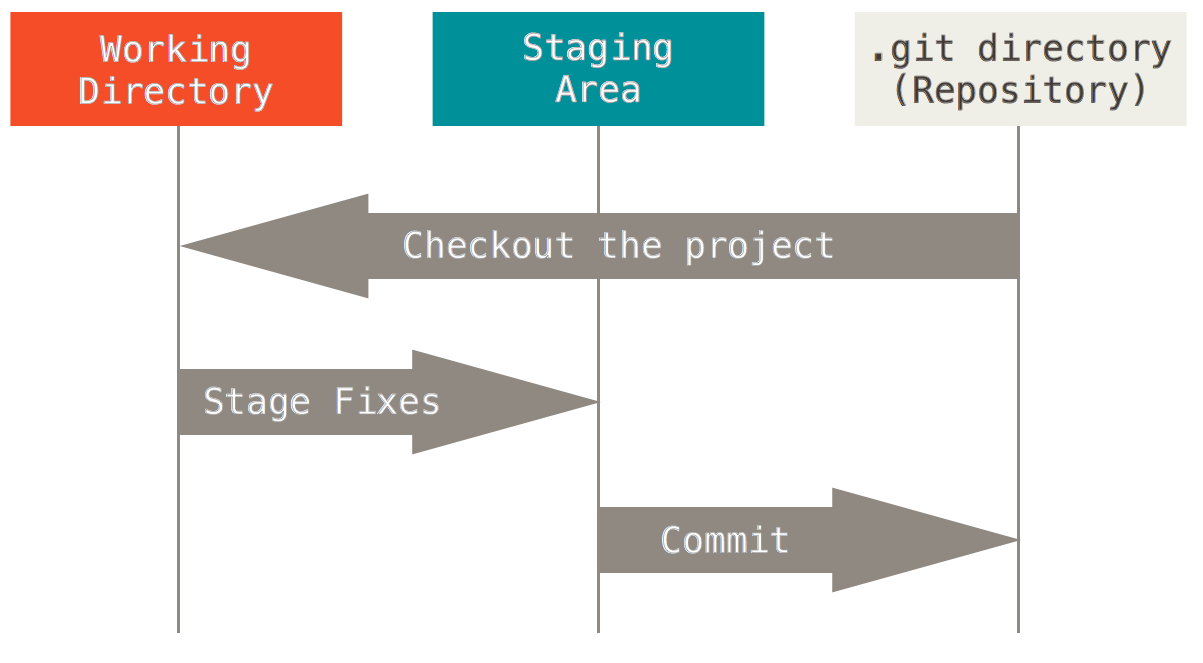
Before working with version control, at the beginning you'll either initialize your repository for use, or “check out” changes from a Remote Repository. After you're up and going, your workflow will look something like this:
- Make changes to one or more files in your Working Directory.
- Add new and/or modified files to the Staging Area.
- Commit those changes to the Local Repository
The following instructions work on Linux, Mac, and Windows.
Start Out: git init
If you have a project or are just starting one, you'll want to tell Git to initialize your project directory. This will give it a Staging Area and a Local Repository, all hidden within the .git directory. You will only do this once for your project!
cd helloworld
git initAdd Files: git add <file>
To add a file (which you later intend to add to the Repository) to the Staging Area, you will use git add filename.ext, identifying the filename (with extension) you want to add. This is referred to as staging a file.
git add filename.extIf you are setting up your project with version control for the first time, you can just add all the files like this:
git add .View Status: git status
If you don't remember which files you've modified, you can always ask Git about the status of your project. Git will tell you which files have been modified, indicate which files have been added to the Staging Area, and even provide some useful tips about what to do next.
git statusCommit Staged Files to the Repository: git commit --message <"log-msg">
Once you have staged some new and/or modified files, you will need to commit them. Otherwise, they will never wind up in the Repository. You'll want to include a log message so that when you review all the revisions in the history, you'll have a little more to go on than just a filename and date.
git commit --message "log message goes here"Modify Working Directory Files
Once you've committed the staged files to the Repository, you'll probably want to go get back to work—which usually includes making more changes to the files in the Working Directory. But you can be confident that your previous revisions are safely stored in the Repository for later querying or retrieval.
View Changes: git diff
View Working Directory Changes
After you've made changes, you might want to ask Git how the files in your Working Directory are different than the ones in the Staging Area. If you haven't staged the files in question, this will essentially tell you how the files have changed since your last commit to the Repository, because after a commit the files in the Staging Area are identical to the last files staged and committed.
git diffView Staged Area Changes
After you've staged some files, you may be interested knowing how they differ from the the last commit in the Repository.
git diff --stagedView History: git log
At any time, you can see a record of all the changes you've ever made for the entire project.
git logIf you only want to see the history of a single file, just identify it by filename.
git log filename.extRemove Files: git rm <file>
If you've added a file to the Repository that you'd later like to remove, there are two ways to go about this. One is that you can delete the file or directory from your Working Directory as you normally would in your operating system. Then, you will add the removal to the Staging Area just as if you were adding a new file or a file modification (see Add Files, above). Finally, you will commit this change to the Repository.
rm filename.ext
git add filename.ext
commit -m "Removed a file."del filename.ext
git add filename.ext
commit -m "Removed a file."The second approach is to use the shortcut command rm which Git has added as a convenient way to produce the same results.
git rm.git rm filename.ext
commit -m "Removed a file."If you want to remove all the files in a directory tree, use the -r switch with the git rm command.
git rm -r.git rm -r directory
commit -m "Removed all the files in a directory tree."Ignoring Files: .gitignore
There will be some files in your Working Directory that you will need to work with locally but never want to commit to the Repository. A notable example are the files inside the target/ directory produced by Maven during a build. Many of these files are temporary files that are generated during the build and have no long-term significance. Moreover all of them can be reproduced at any time by simply re-running the Maven build.
The files that you want under version control are only those that comprise the source code and other files related to the application and build configuration such as pom.xml. To request that Git ignore other files, you will need to list them explicitly (either singly or using a file pattern) in a special file named .gitignore that resides in the root directory of your project (at the same level as the special .git directory containing the Repository).
The following is a sample .gitignore file that will ignore the Maven target/ build directory. (Lines that begin with # represent comments; Git pays no attention to them.)
.gitignore#Maven build files
/target/Once you have created the .gitignore file, you will want to commit it to your Repository so that it can be under version control and shared with your teammates. As you modify this file over time, keeping the file under version control assures that the entire team is using the same Git ignore settings for the project.
Archiving a Git Repository: git bundle create <file>
A Repository contains all the committed changes that have ever been made to your project. You can always use an archiving tool such as 7z to store all the files in the Local Repository for backup. However Git provides a command named bundle that allows you to export the entire history into a single “bundle” file for easy archiving. Substitute your project name for repo in repo.bundle below.
git bundle create repo.bundle --allReview
Summary
| Command | Description | Example |
|---|---|---|
git init | Initializes the current directory as a Git project with a Working Area, Staging Area, and Local Repository. | git init |
git add <file> | Adds a file to the Staging Area but does not commit it to the Local Repository. The added file must be committed before the Repository is changed. | git add readme.txt |
git reset <file> | Removes a file from the Staging Area that has not yet been committed. | git reset readme.txt |
git status | Shows the status of the files in the Working Directory. | git status |
git diff [--staged] | Shows differences between the Working Directory and the Staging Area; or if --staged is included, between files in the Staging Area and the Repository. | git diff |
git commit [--all|-a] --message|-m <"log-msg"> | Commits all files in the Staging Area to the Repository, optionally first adding modified files if --all (-a) is included | git commit -m "log message goes here" |
git log [<file>] | Shows history of commit log messages for the Repository, or for a single file. | git log |
git rm <file> | Removes a file from the Working Directory and from the Staging Area. Equivalent to manually removing a file from the Working Directory and then using git add for the removed file. The removal must be committed before the Repository is changed. | git rm readme.txt |
git bundle create <file> --all | Creates an archive file of the entire history of Local Repository. | git bundle create repo.bundle --all |
Gotchas
- Don't accidentally check in temporary files to the Repository, such as those in the Maven
target/directory.
In the Real World
- Commit the
.gitignorefile to the Repository so that your teammates can stay in sync about which files in the project are under version control and which are not.
Self Evaluation
- What is the difference between the Staging Area and the Repository?
- Where is the “global” Git configuration information stored for the current user?
- How does Git know whether a file has been renamed in each snapshot?
Task
Put your Booker application from the previous lesson under version control using Git. All future changes to Booker should be staged and then committed to the Local Repository. You should have at least one commit for each lesson that asks you to make modifications to Booker, although you are free to make as many commits as you want.
Send your entire Booker project, now under Git source control, to your teacher as a single archive bundle of the Local Repository.
See Also
- About Version Control (Pro Git, Second Edition)
- What is Version Control? [Learn Git Video Course] (YouTube - Tower)
- Installing Git (Pro Git, Second Edition)
- First-Time Git Setup (Pro Git, Second Edition)
- Installing & Configuring Git [Learn Git Video Course] (YouTube - Tower)
- Introduction to Git Version Control (YouTube - Gareth Hall)
- Git Basics (Pro Git, Second Edition)
- Ry's Git Tutorial (RyPress)
- Git - The Simple Guide (Roger Dudler)
References
- Pro Git, Second Edition (Apress)
- Learn Version Control with Git (Tower)
- Git How To
- Setting your username in Git (GitHub Help)
- Setting your email in Git (GitHub Help)
- Dealing with line endings (GitHub Help)
- Basic Git Commands (Atlassian Documentation)
- Git Cheat Sheet (Tower)
- gitignore (Git Reference)
Resources
Acknowledgments
- Images are from Pro Git, Second Edition, licensed under the Creative Commons Attribution 3.0 Unported License.